Easy Cottage Cheese Chips – A Delicious, Guilt-Free Snack

Standing in my kitchen, the mouthwatering smell of baked goodness instantly grabbed my attention. I was on the hunt for a snack that’s light but totally satisfying—enter my Crispy Cottage Cheese Chips! This easy, high-protein, and low-carb snack comes together with minimal effort, making it a perfect option when you want something healthier than regular chips. These crunchy bites are naturally gluten-free and super adaptable, great for snacking at game nights or adding a delicious crunch to your salads. With just a few straightforward ingredients, you’ll have a guilt-free treat loaded with flavor. Want to learn how to make this tasty little gem? Let’s jump right in and explore how to turn simple cottage cheese into crispy, crunchy perfection!
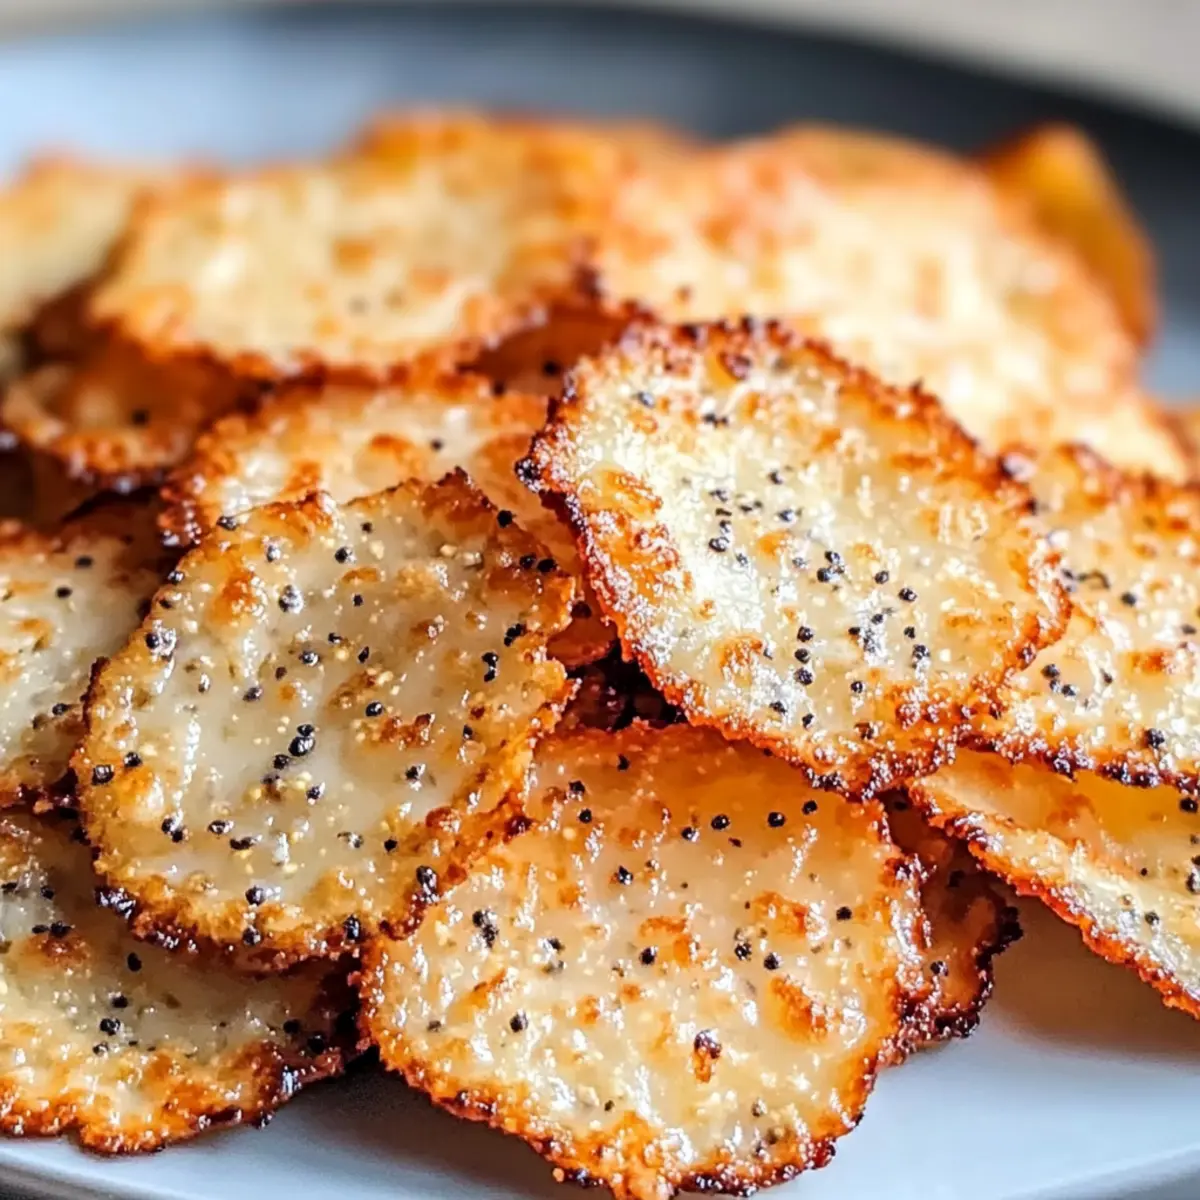
Reasons to Love These Chips
Crunch That Happens: These chips pack a crispy punch you’ll love—snack after snack—without the guilt of traditional fried options.
Smart Snacking: Loaded with protein and low on carbs, they’re an easy fit for keto, gluten-free, or low-carb eating plans. If you like a sturdier, dippable option, try these high-protein cottage cheese crackers.
Simple and Flexible: No fancy equipment or tricky steps needed! Try these 1-ingredient cottage cheese chips for the simplest method. Bake them, or zap them for a quick fix — either way, they’re a fast high-protein snack.
Flavors Your Way: Get creative with your favorite spices or nutritional yeast for that cheesy umami pop without dairy.
Share the Crunch: These are perfect for bringing to parties, family movie nights, or just whenever snack time calls. A great way to swap out less healthy munchies.
Want to boost your snack game? Pair these chips with French Onion Dip or toss them on top of fresh salads for a nice crunch. They really do hit the spot!
Ingredients for the Chips
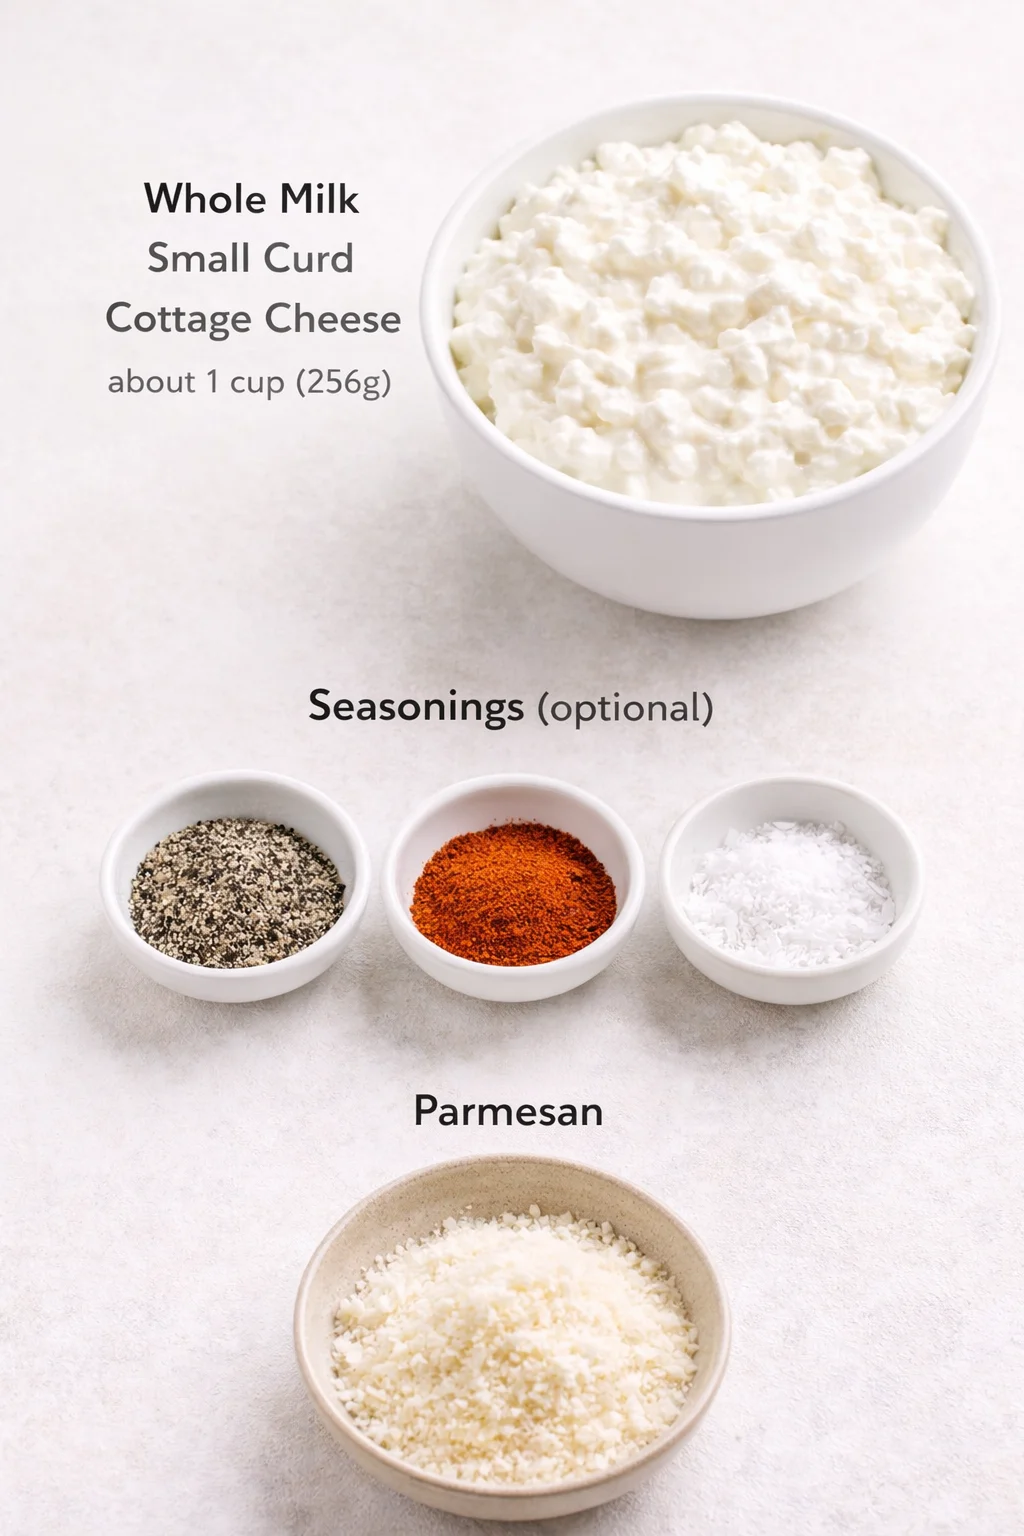
- About 1 cup (256g) Whole Milk Small Curd Cottage Cheese — full-fat works best for crispness since it has less moisture.
- Seasonings (optional) — pick your favorites; a dusting of Parmesan cheese adds a tasty, savory touch.
How to Bake and Shape
- Preheat oven to 350°F (175°C) and line a baking sheet with parchment paper.
- Drain excess liquid from the cottage cheese until it reaches a thick, paste-like consistency.
- Using a 1-tablespoon cookie scoop, drop dollops of the thickened cottage cheese onto the lined sheet about 2 inches apart.
-
Press each dollop flat with the back of a spoon or your fingers to about 1/4 inch thickness.
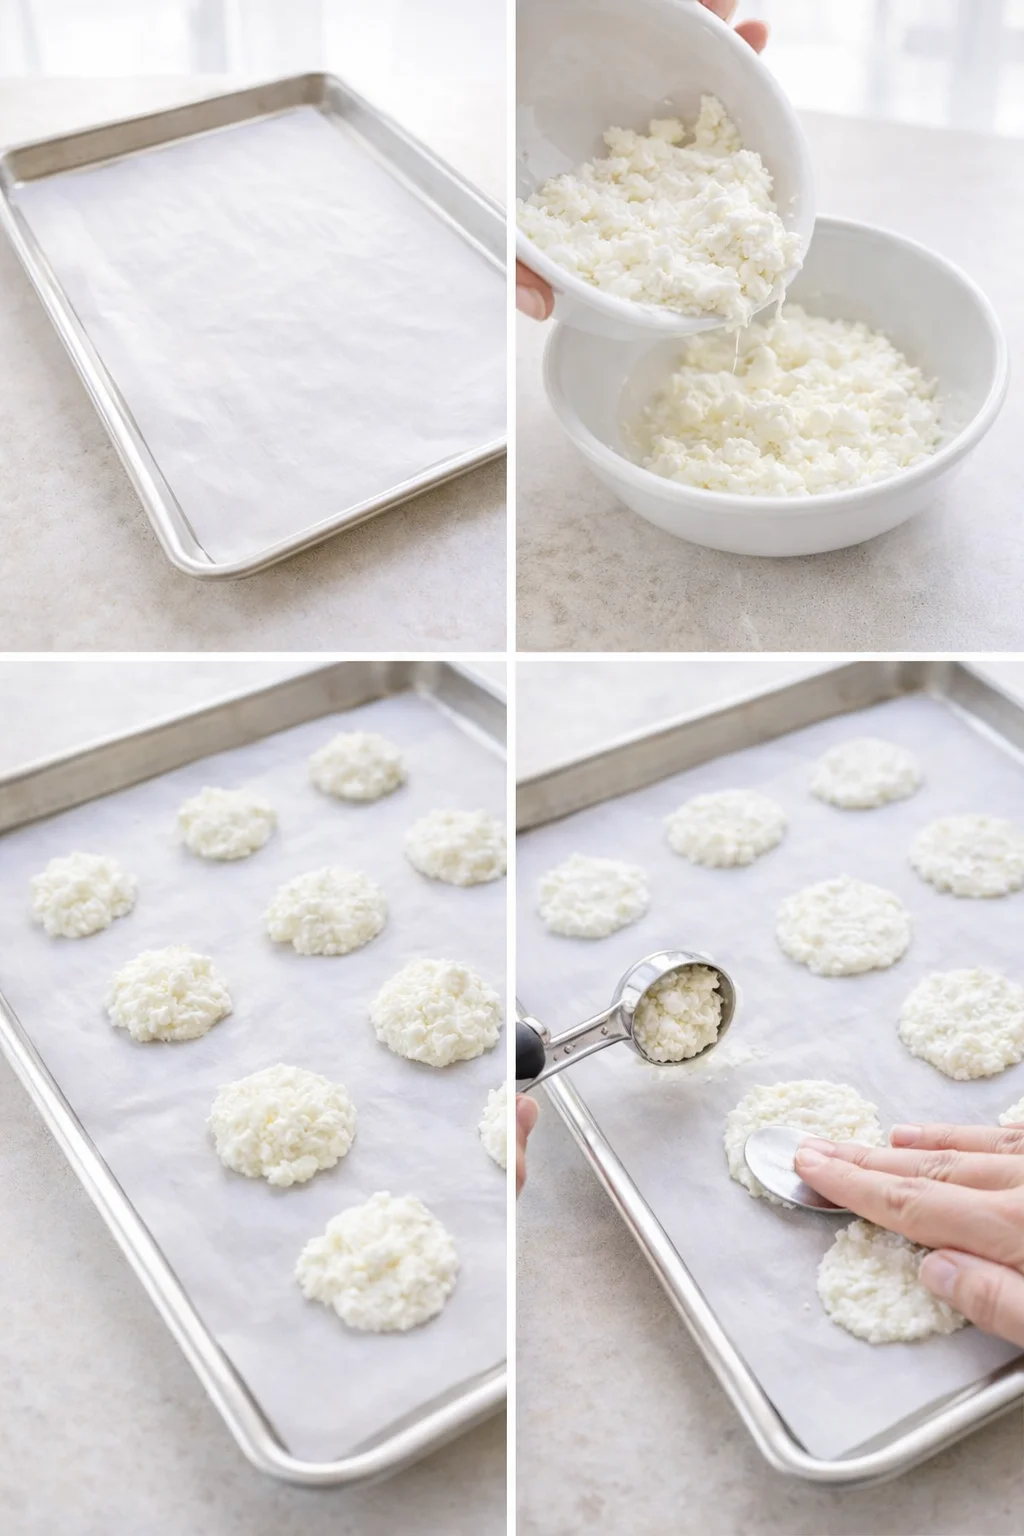
- Sprinkle desired seasonings (e.g., Parmesan, garlic powder, chili flakes) over each flattened dollop.
- Bake in the preheated oven for 40–50 minutes, checking at about 20 minutes for deep golden-brown edges and toasted tops.
-
Remove the baking sheet from the oven and let the chips cool completely on the sheet to crisp up before serving.
Tricks for Perfect Crunch
• Make Sure Oven Is Ready: Always preheat your oven fully to 350°F (175°C) before putting the chips in. Even heat is key for crunch.
• Drain that Cottage Cheese Well: Don’t skip draining the liquid; too much moisture means soggy chips—the same principle you use for getting truly crispy hash browns.
• Flatten Evenly: Aim for about 1/4 inch thickness when shaping your chips to ensure they bake evenly and avoid burnt edges or gooey middles—it’s the same thin, even spread that makes a 3-ingredient cottage cheese pizza crust turn out crisp.
• Season Smartly: Have fun with flavors, but don’t overdo it—let the cozy cottage cheese shine through.
• Store with Care: After cooling, keep chips in an airtight container at room temp for up to 2 days. Parchment paper between layers prevents sticking and keeps crisps crisp.
Enjoy every crunchy bite knowing you’re snacking thoughtfully and deliciously!
Flavor Swaps and Mix-Ins
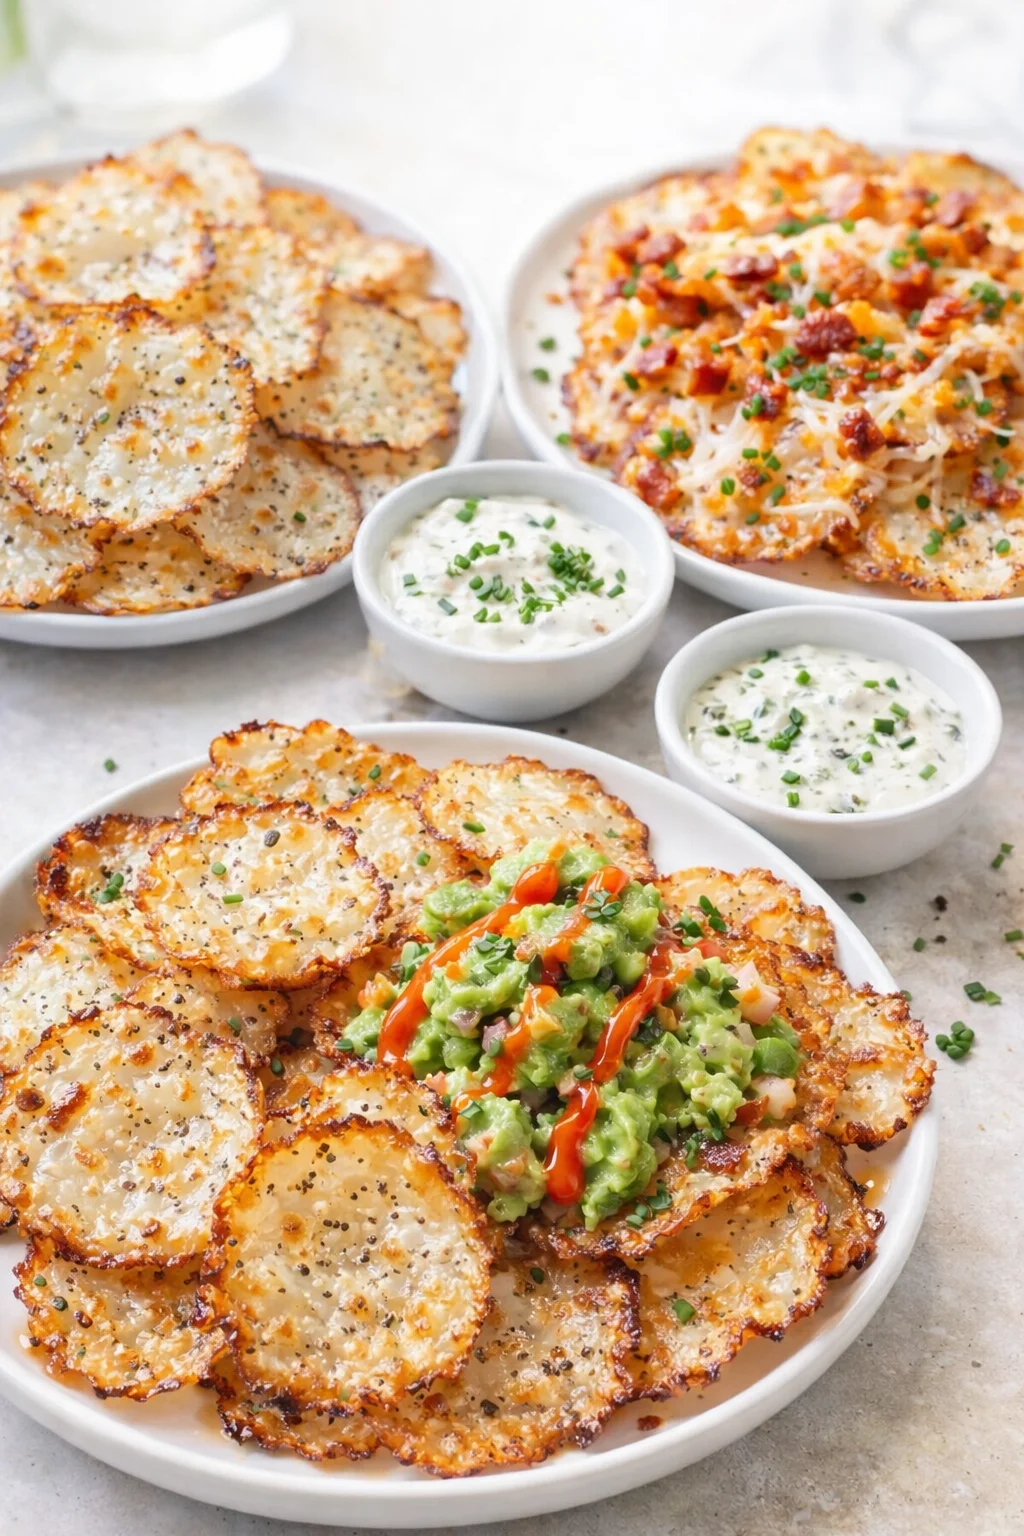
Ready to mix things up? These fun flavor variations will keep your cottage cheese chips interesting and delicious every time.
- Spicy Heat: Toss in chili flakes or cayenne pepper for a kick of spice that wakes up your taste buds.
- Herbal Goodness: Stir in dried oregano, thyme, or rosemary—fresh herbs work wonders too for a garden-fresh vibe.
- Cheesy Umami: Sprinkle nutritional yeast before baking to mimic cheesy notes without extra dairy—perfect if you’re vegan or cutting back on fat.
- Sweet Treat: Try a dash of cinnamon and a sprinkle of sugar or monk fruit sweetener for a dessert-like chip, fantastic with yogurt.
- Garlic Punch: Mix minced garlic or garlic powder into the cottage cheese for a bold, savory flavor. Serve with a garlic dip for a double hit.
- Lemon Zest: Add freshly grated lemon zest for a bright, refreshing twist—great for light snacking on warm days.
- Parmesan Boost: Fold in some freshly grated Parmesan for a savory, nutty flavor that pairs beautifully on a cheese board.
- Smoky Depth: Give your chips a subtle smoky touch with smoked paprika, adding a lovely complexity.
Whether sharing these chips at a movie night or savoring solo, these variations make sure your snack game never gets boring.
Looking to build a complete snack or light meal? Here are some great pairings:
- Creamy Hummus: Silky smooth and rich, hummus contrasts beautifully with the crunch—or try a smoky-smooth black bean dip.
- Guacamole: The creamy avocado blends perfectly with the crispy texture, bringing fresh flavors.
- Zesty Salsa: Bright, tangy salsa—like this mango salsa—adds an exciting punch that livens up every bite.
- Mixed Green Salad: Toss cottage cheese chips on top for a crunchy twist that makes salads feel special.
- Roasted Veggies: Earthy roasted vegetables pair nicely and round out your plate.
- Tzatziki Sauce: Cool yogurt and cucumber dip give a refreshing balance to the warm chips.
- Sparkling Water: A fizzy lemon or lime drink cleanses your palate and keeps snacking fun.
- Dark Chocolate: Enjoy a little sweet treat that contrasts the salty crunch for perfect balance.
- Cheese Platter: Mixing chips with an array of cheeses makes for a crowd-pleasing spread.
- Chili or Soup: Serve chips alongside warm bowls of soup for comforting, hearty combos.
Storage, Make-Ahead, and Shelf Life
Cottage Cheese Chips are a wonderful snack to prep ahead and save time on busy days! You can scoop and shape your cottage cheese mixture up to 24 hours before baking — just cover it tightly with plastic wrap and chill. When you’re ready, pop the tray straight from the fridge into the oven to bake with the same amazing crunch. Leftover chips store well in an airtight container at room temp for up to 2 days and will still taste great. If you love make-ahead crunchy snacks, try these oven-baked cottage cheese crackers.
Room Temperature: Keep cooled chips in an airtight container at room temp for up to 2 days to hold their crisp texture.
Refrigerate: For longer freshness, store chips in the fridge for 3 to 4 days. Use parchment paper layers to keep them separate and crunchy.
Freeze: While best fresh, you can freeze chips up to 2 months. Freeze them first on a baking sheet, then transfer to a sealed bag or container to avoid freezer burn.
Reheat: Bring back the crunch by warming chips in a 350°F (175°C) oven for 5 to 10 minutes before enjoying again. The same quick reheat works beautifully for gluten-free, low-carb baked zucchini fries.
Answers to Common Questions
What kind of cottage cheese works best?
I suggest whole milk, small curd cottage cheese for the best crispy results. The full-fat version has less moisture, which helps yield a crunchier chip. Avoid low-fat cottage cheese since it can make the chips soggy.
How long do these chips last?
When stored in an airtight container, cooled cottage cheese chips stay fresh at room temperature for about 2 days. Refrigerating them extends freshness to 3 or 4 days; just remember to layer with parchment paper to prevent sticking.
Can I freeze these chips?
Yes! While fresh is best, you can freeze chips up to 2 months. Lay them out on a baking sheet first to freeze individually, then move to a sealed container or bag to keep them safe from freezer burn.
What if my chips aren’t crispy enough?
If your chips lack crispness, it usually means there’s too much moisture in the cottage cheese. Make sure to drain it well before shaping. Also, keep the thickness consistent around 1/4 inch when flattening. If needed, bake a little longer—5 to 10 extra minutes can make all the difference.
Are these chips safe for people with allergies?
Cottage Cheese Chips are naturally gluten-free, but always check labels on your ingredients if allergies are a concern. Also, watch out for any spices used if serving kids or pets to make sure everything is safe and suitable.
Can I add other ingredients to the chips?
Absolutely! You can personalize your chips with spices or Parmesan additions—try a pinch of chili powder or finely minced jalapeño for heat, inspired by our jalapeño poppers—but go easy so as not to affect texture. Nutritional yeast is also a great way to add cheesy flavor without dairy.
A healthy, high-protein, low-carb snack made by baking whole milk small curd cottage cheese into crispy chips with optional seasonings.
- Prep Time: 10 minutes
- Cook Time: 40-50 minutes
- Total Time: 50-60 minutes
- Yield: Approximately 1 cup of chips 1x
- Category: Snack
- Cuisine: American
Ingredients
- 1 cup whole milk small curd cottage cheese (full-fat preferred for crispier texture)
- Seasonings of choice (e.g., garlic powder, chili flakes, Parmesan cheese, nutritional yeast)
Instructions
- Preheat the oven to 350°F (175°C) and line a baking sheet with parchment paper.
- Drain all the extra liquid from the cottage cheese until you achieve a thick, creamy paste consistency.
- Using a 1-tablespoon cookie scoop, drop spoonfuls of cottage cheese onto the lined baking sheet, spacing about 2 inches apart.
- Gently press each mound flat to approximately 1/4 inch thickness.
- Sprinkle your chosen seasonings evenly over each flattened dollop.
- Bake in the preheated oven for 40 to 50 minutes, checking at 20 minutes to ensure edges are deep golden brown and the surface is toasted.
- Remove from the oven and let the chips cool completely on the baking sheet to crisp up before serving.
Notes
Store cooled chips in an airtight container at room temperature for up to 2 days; use parchment paper between layers to prevent sticking., Refrigerate chips for 3 to 4 days, layering with parchment paper to maintain crunchiness., Freeze chips up to 2 months by first freezing individually on a baking sheet, then transferring to a sealed container or bag., Reheat frozen or refrigerated chips in a 350°F (175°C) oven for 5 to 10 minutes to restore crispness., Drain the cottage cheese well to avoid soggy chips., Maintain 1/4 inch thickness for even baking and crunchiness., Season chips lightly to let the cottage cheese flavor shine through.
Nutrition
- Serving Size: 1 cup
- Calories: 100 kcal per 1 cup serving
- Fat: 4 g per serving
- Carbohydrates: 5 g per serving
- Protein: 14 g per serving