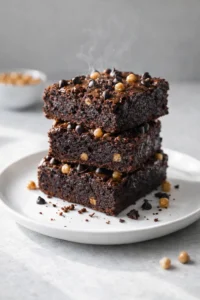
Chocolate Chickpea Brownies
If you’re feeling curious—or maybe even a little skeptical about baking with beans—I totally get it. But trust me, these brownies will change your mind. Canned chickpeas are the star here, creating brownies that stay moist and super fudgy. The cocoa powder and chocolate chips bring intense chocolate flavor without needing any butter or regular flour.
This recipe is all about keeping things easy and fast: just toss everything in a food processor for one simple bowl of batter. Bake for about 14 minutes, then pop them in the fridge to set up just right for slicing. You’ll end up with 8 to 12 delicious, fudgy brownies that are easy to customize—whether you want vegan, oil-free, or gluten-free versions. Plus, they’re perfect for making ahead!
Stick with me—I’ll guide you through every step, share tips to avoid watery batter, offer ingredient swaps, and even give you my best storage tips so your brownies stay fresh and fudgy.

If you normally raise an eyebrow at beans in your brownies, you’re definitely in the right spot. These chocolate chickpea brownies use canned chickpeas as a sneaky secret to deliver dense, fudgy, and moist bars — no butter or regular flour needed. And the best part? They taste rich and chocolatey, not at all “bean-y.” Most folks can’t believe what’s inside!
This recipe is designed for simplicity and speed: everything goes straight into a food processor for a true one‑bowl batter. Then bake for about 14 minutes, and chill so the center firms into that perfect fudgy texture. You’ll get roughly 8–12 brownies, and the recipe is super easy to adapt for vegan, oil‑free, or gluten‑free diets.
Keep reading for clear, step‑by‑step instructions, baking timing tips to get that amazing underbaked but fudgy center, and troubleshooting to avoid a watery batter. Plus, I’ll throw in simple swaps, mix‑in ideas, and storage tips so your brownies stay fresh and rich. Ready to taste something surprisingly delicious? Let’s get going.
Fudgy, Fast, and Diet-Friendly
- Rich, fudgy chocolate that beats traditional buttered brownies any day — chickpeas bring a wonderfully moist, dense texture.
- Super fast and fuss-free: just dump all ingredients into a food processor for a one-bowl, no-mess treat. For another quick chocolate fix, try these 4-ingredient Chocolate Pistachio Puff Pastry Swirls.
- Totally flexible and diet-friendly: easy to tweak for vegan, oil-free, or gluten-free versions just by swapping a few ingredients.
- Fun secret ingredient — no one will guess these brownies are made from beans! It’s a sneaky way to add nutrition without losing flavor.
- Perfect make-ahead snack — chilling firm-ups the brownies and flavors even deepen the next day. For a seasonal twist, try Pumpkin Pie Cheesecake Brownies.
Ingredients plus Simple Swaps

- 1 can (15 oz) chickpeas or white beans, drained and rinsed well
- 2 tbsp cocoa powder
- 2 tbsp Dutch-process cocoa (or just add more regular cocoa if you don’t have it)
- 1/3 cup flour of choice (white, oat, spelt, almond, sorghum—whatever suits you)
- 3 tbsp milk or applesauce for moisture
- 3 tbsp oil or nut butter of choice (optional if you want oil-free)
- 1 tsp pure vanilla extract
- 1 tsp baking powder
- 1/4 tsp baking soda
- 1/4 tsp salt
- 1/2 cup sugar
- 1/2 cup chocolate chips (definitely recommended for that melty chocolate goodness!)

Blend, Bake, and Finish the Brownies
- Drain and rinse the chickpeas (or white beans) thoroughly, then pat them dry with a towel.
- Preheat the oven to 330°F (165°C).
- Grease an 8-inch square pan or line it with parchment, leaving an overhang for easy removal.
-
Place all ingredients in a food processor and blend until silky smooth, stopping to scrape down the sides as needed.

- Spread the batter evenly into the prepared pan and press extra chocolate chips on top if desired.
- Or, for muffins, divide batter into a lined muffin tin and bake for 12–16 minutes, watching closely to avoid overbaking.
- Place the pan on the middle oven rack and bake about 14 minutes, removing when the edges are set but the center is still slightly underbaked.
-
Let the pan cool to room temperature.

- Chill the brownies in the refrigerator for several hours or overnight to firm up.
-
After chilling, frost with melted chocolate or your favorite frosting if desired, then lift out using the parchment overhang and cut into squares.

Pro Tips for Fudgy Results
- Make sure to rinse and drain your beans thoroughly to avoid a watery batter. Pat them dry if you need to.
- Use a food processor for the smoothest batter—blenders might leave little bean bits behind.
- Watch the bake time closely. Take the brownies out when they’re a bit soft in the middle for that perfect fudge-like feel.
- Line your pan with parchment and leave an overhang to lift the whole batch out cleanly and slice neatly.
- If you’re using coconut flour (which soaks up a lot of moisture), reduce it to 2 tablespoons instead of 1/3 cup flour.
- If you want to skip oil, applesauce works well but expect a slightly softer texture. Nut butter is a great option too, adding richness without extra oil.
These brownies are fantastic on their own but pairing them with a scoop of vegan vanilla ice cream, a drizzle of caramel sauce, or a sprinkle of popping candy chocolate bark takes them over the top. For a grown-up treat, try serving with a cup of rich coffee or hot cocoa. They also make a simple, satisfying lunchbox snack for kids and adults alike. For another lunchbox-friendly sweet, try these cake pop truffles with popping candy.
Swaps, Mix-Ins, and Flavor Twists
- Swap chickpeas for white beans if you want a milder flavor but still keep that amazing fudgy texture.
- Love nuts? Use peanut or almond butter instead of oil, and swirl some on top before baking for a nutty twist.
- Try folding in chopped nuts, dried fruit, or a teaspoon of instant espresso powder for extra flavor depth.
- Going gluten-free? Use a certified gluten-free flour blend or almond flour (and remember to adjust if you use coconut flour).
- For a fancy finish, top with a healthy chocolate frosting or melt extra chocolate chips for a quick, glossy glaze.
- Make these portable by baking them as muffins in a lined tin for 12 to 16 minutes—just keep a close eye so they don’t overbake.
- For a nutty twist, swap oil for your favorite nut butter like almond or peanut, and swirl some on top before baking.
- Add a teaspoon of instant espresso powder to deepen the chocolate flavor without adding bitterness, or go cozy with a pinch of pumpkin pie spice—see how it pairs with chocolate in these Soft Pumpkin Chocolate Chip Cookies.
- Fold in chopped nuts or dried fruits to add texture and bursts of flavor.
- Use different types of flour like oat, spelt, or sorghum to change things up based on your pantry and preference.
Storage and Make-Ahead Tips
Store your brownies in an airtight container in the fridge for 4 to 7 days. Since they’re moist, chilling keeps them fresh and preserves that fudgy texture.
To freeze, wrap the whole chilled slab or individual slices tightly with plastic wrap or foil and freeze for up to 3 months. When you’re ready to enjoy, thaw them in the fridge or at room temperature. Warm gently in the microwave or oven if you want that just-baked softness back.
Make-ahead tip: bake and chill the brownies, then freeze them whole and uncut. Slice after thawing and enjoy anytime you need a quick chocolate fix! For another make-ahead bake to keep on hand, try Homemade Blueberry Poptarts.
Keep your brownies fresh by storing them in an airtight container in the fridge for up to a week. This not only preserves their fudgy texture but also prevents them from drying out. If you plan to keep them longer, frozen storage works wonderfully.
You can bake these brownies ahead of time and store them chilled in the fridge. For longer storage, freeze them uncut, then slice after thawing. This makes it easy to grab a treat whenever the craving strikes without extra fuss!

Common Questions Answered
- Are these brownies vegan? Yes! When you use plant-based milk and no animal products, these brownies are completely vegan.
- Will they taste like beans? Nope! The cocoa, sugar, and chocolate chips completely hide any bean flavor. Most people never guess the secret ingredient.
- Can I use canned chickpeas? Definitely. Just make sure to drain and rinse them well before using to keep the batter from getting too watery. If you have some left over, use them in our Broccoli Chickpea Pasta with Garlic Olive Oil.
- Can I use other kinds of beans? Sure! White beans work great and black beans are good in similar recipes too.
- Can I make these gluten-free? Absolutely. Just swap in gluten-free flour or nut flours (remember to adjust if you use coconut flour).
- Why do you chill the brownies instead of baking longer? Chilling sets the center without drying out the brownies, keeping them dense and fudgy. Baking longer makes them cakey and dry.
- Can I skip the chocolate chips? You could, but I don’t recommend it. Chocolate chips melt into little pockets of rich chocolate and add great texture contrast.
- Can I double this recipe? For sure! Use a bigger pan and bake a bit longer. Keep the same trick: pull out when slightly underbaked and chill to set for best fudginess.
- Can I substitute chickpeas with black beans? Yes! Black beans work well and offer a slightly different but still delicious fudgy texture.
- What if I don’t have Dutch-process cocoa? No problem! Just use twice the amount of regular cocoa powder instead.
- How do I know when the brownies are done? The edges will look set, but the middle should still be a little soft and underbaked for that perfect fudgy bite.
- Can I use a blender instead of a food processor? A food processor is best for smooth batter, but a high-powered blender can work if you stop occasionally to scrape the sides.
- Do I have to chill the brownies before slicing? Chilling helps set the brownies for clean slices and better texture—so highly recommended! If you’d like a chocolate dessert you can slice and serve right away, try our Red Wine & Chocolate Pecan Galette.

Vegan Chocolate Chickpea Brownies are rich, fudgy, and moist brownies made using canned chickpeas as a secret ingredient for a dense texture without butter or regular flour. They are quick to prepare, baked in about 14 minutes, and chilled to set, yielding 8 to 12 delicious brownies suitable for vegan, oil-free, or gluten-free diets.
- Prep Time: 10 minutes
- Cook Time: 14 minutes
- Total Time: 24 minutes plus chilling time (several hours or overnight)
- Yield: 8 to 12 brownies 1x
- Category: Dessert
- Cuisine: American
Ingredients
- 1 can (15 oz) chickpeas or white beans, drained, rinsed, and patted dry
- 2 tbsp cocoa powder
- 2 tbsp Dutch-process cocoa powder (or 4 tbsp regular cocoa powder if Dutch-process is unavailable)
- 1/3 cup flour of choice (such as white, oat, spelt, almond, sorghum; 2 tbsp if using coconut flour)
- 3 tbsp milk or applesauce (for moisture)
- 3 tbsp oil or nut butter of choice (optional for oil-free version; nut butter adds richness)
- 1 tsp pure vanilla extract
- 1 tsp baking powder
- 1/4 tsp baking soda
- 1/4 tsp salt
- 1/2 cup sugar
- 1/2 cup chocolate chips (recommended for melty chocolate pockets)
Instructions
- Preheat oven to 330°F (165°C). Grease an 8-inch square pan or line it with parchment paper with overhang for easy removal.
- Drain, rinse, and pat dry the chickpeas or white beans thoroughly to remove excess moisture.
- Place all ingredients into a food processor and blend until smooth and silky, scraping down the sides as needed to eliminate any lumps.
- Spread the batter evenly into the prepared pan. Optionally, press extra chocolate chips on top for decoration.
- Bake on the middle rack for about 14 minutes. Remove when the edges are set, but the center looks slightly underbaked for a fudgy texture.
- Allow the pan to cool, then refrigerate the brownies for several hours or overnight to set the center.
- Optional: Frost with melted chocolate or your favorite chocolate frosting after chilling, then cut into squares and serve.
Notes
Thoroughly rinsing and drying beans prevents watery batter., A food processor yields the smoothest batter; blenders require scraping and may leave texture., Pull brownies when slightly underbaked to maintain fudginess; longer baking causes cakey, dry brownies., Parchment paper with overhang helps remove and slice brownies cleanly., When using coconut flour, reduce it to 2 tablespoons due to high absorbency., Use applesauce instead of oil for an oil-free version, though texture may be softer., Nut butters can replace oil and add richness; swirl some on top before baking for a nutty twist., Mix in chopped nuts, dried fruit, or 1 tsp instant espresso powder to enhance flavor., Brownies store well in an airtight container in the fridge for 4 to 7 days, maintaining moistness., Freeze whole slab or individual slices wrapped tightly up to 3 months; thaw in fridge or at room temperature before serving., Make ahead by baking and chilling brownies, freezing uncut, and slicing after thawing., Serve with vegan vanilla ice cream, caramel sauce, coffee, or hot cocoa for an enhanced experience.
Nutrition
- Serving Size: 1 brownie
- Calories: Approximately 150-180 calories per brownie (based on ingredients and 12 servings)
- Fat: Approximately 6-8 grams per serving
- Carbohydrates: Approximately 25 grams per serving
- Protein: Approximately 3-4 grams per serving
More in Desserts
High-Protein Overnight Oats
Pumpkin Honey Bun Cake