Cheese Danish
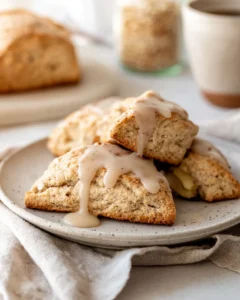
A Cheese Danish is a wonderfully flaky pastry made from tender dough filled with a creamy, lightly sweetened cheese mixture. It’s a favorite breakfast treat you often find in bakeries and cafés because it’s rich, buttery, and never too heavy. The filling usually blends cream cheese, sugar, and vanilla into a smooth, silky center that pairs perfectly with the golden, flaky pastry layers. Although it looks fancy, making a Cheese Danish at home is totally doable—especially when you start with store-bought puff pastry as your shortcut.

This pastry is ideal for breakfast, brunch, or a cozy snack any time you want. Kids and grown-ups both love it because it’s kind of like a delicious mix of cheesecake and croissants—how great is that? Plus, you can customize it however you like by adding fresh fruit toppings, drizzling a sweet glaze, or sprinkling some chocolate chips on top. Once you get the hang of the classic Cheese Danish, you’ll be excited to get creative with your variations.
Why You’ll Love Making Cheese Danish at Home
Baking Cheese Danish yourself is such a rewarding win! This pastry looks fancy, but you don’t need expert skills or hard-to-find ingredients to pull it off. All you really need are simple staples like cream cheese, sugar, an egg, and your puff pastry sheet. It’s even a fantastic family activity—kids love helping fold the corners and shape the pastries, making baking fun and memorable for everyone.
Cheese Danish pastries fit right in any situation. Whether you need a quick breakfast on a hectic morning, a tasty school snack for the kids, or a treat to impress guests during brunch, these pastries deliver every time. You can keep them simple or fancy them up with berries or a sprinkle of powdered sugar. Believe me, once you taste a warm Cheese Danish fresh from your oven, you’ll want to make them on repeat.
Ingredients for Cheese Danish
Here’s what you’ll need to whip up these delicious Cheese Danishes:
- 1 sheet puff pastry, thawed
- 8 oz (225 g) cream cheese, softened
- 1/4 cup sugar
- 1 teaspoon vanilla extract
- 1 egg
- 1 tablespoon milk (for the egg wash)
- Optional: fruit preserves, powdered sugar glaze, fresh berries
How to Make Cheese Danish
Step One
Start by preheating your oven to 200°C (400°F). Line a baking sheet with parchment paper to prevent sticking and make cleanup a snap. Place your puff pastry on a clean surface and gently roll it out a bit—if it cracks here and there, don’t stress. Just fold the edges over lightly to smooth it out. Then, cut the pastry into 6 equal squares.
Step Two
Next, for each square, carefully cut a smaller square inside it without slicing all the way through. This creates a little border so the edges puff up nicely in the oven while keeping the center flat for the smooth cheese filling.

Step Three
Let’s make that luscious cheese filling now! In a medium bowl, blend together the softened cream cheese, sugar, vanilla, and egg. Beat everything until it’s silky smooth, creamy, and completely lump-free—sort of like thick frosting. If you want an extra pop of flavor, spoon a tiny bit of your favorite strawberry or raspberry jam right into the center of each pastry square before adding the cheese filling.
Step Four
Gently spoon a generous dollop of the cheese filling into the middle of each pastry square. Spread it so it stays inside the smaller square you cut earlier. This keeps your danish looking tidy after baking. Just be careful not to overfill—about one or two tablespoons per square works perfectly to avoid any filling spilling over while baking.

Step Five
Now for the golden finish! Whisk the egg and milk together in a small bowl to make your egg wash. Using a brush or even your fingertip, lightly paint the edges of each pastry square with the wash. This step really helps create that beautiful shiny, golden crust. Place the baking sheet in the oven and bake for 13–17 minutes, until the edges puff up and turn golden brown. The cheese center will look set and slightly puffed.
Step Six
Once done, carefully remove the cheese Danish from the oven with mitts. Let them cool on a rack for 5 to 10 minutes so the filling can settle nicely. If you like, mix powdered sugar with a bit of milk to make a simple glaze and drizzle it over the top once the danishes have cooled a little. Fresh berries or a dusting of powdered sugar also make a lovely finishing touch.

Kitchen Equipment Needed :
Before you get started, have these tools handy:
- Mixing bowl
- Whisk
- Fork
- Spatula
- Measuring cups and spoons
- Baking sheet
- Parchment paper
- Knife for cutting pastry
- Small bowl for egg wash
- Oven mitts
- Cooling rack
Tips for Making the Best Cheese Danish
Don’t overfill—the cheese mixture can bubble over if you add too much.
Use softened cream cheese so your filling is perfectly smooth and creamy.
You can freeze unbaked assembled pastries—just pop them in the freezer and bake fresh when you want.
For extra flavor, add a spoonful of your favorite jam under the cheese filling before baking.
Serving Suggestion
I love serving Cheese Danish warm for breakfast alongside a fresh cup of coffee or a creamy milkshake. My kids always ask for chocolate milk to go with theirs, while my husband usually sips on some fresh juice. It’s a simple, cozy treat that the whole family will enjoy any time of day.

Frequently Asked Question
Can I make a fruit version?
Absolutely! Adding jam, fresh fruit slices, or berries before baking is a great way to switch things up and add a fruity flair.
Can I freeze Cheese Danish?
Yes! Baked Cheese Danish store well in the freezer for up to one month. Just reheat them in the oven when you’re ready to enjoy.
Can I use flavored cream cheese?
Definitely. Cream cheeses with flavors like vanilla, strawberry, or honey pecan add a fun twist to your filling.
Should I store leftovers in the fridge or on the counter?
Since these have cream cheese, it’s best to keep leftovers refrigerated to stay fresh and safe.
Storage Tips
Store any leftover Cheese Danish in an airtight container in the fridge for up to 3 days. To warm them up, pop the danish in a 350°F (175°C) oven for 5–7 minutes until heated through. Avoid leaving them out at room temperature because the cream cheese can spoil quickly.
Make-Ahead Tips
You can put together these Cheese Danishes ahead of time by assembling them on your baking sheet and freezing before baking. When you want to serve fresh pastries, just bake them from frozen—adding a few extra minutes to the baking time. This trick is a real lifesaver for busy mornings or unexpected guests!
Variations
If you want to mix things up a bit, try these fun variations:
- Stir lemon or orange zest into the cheese filling for a bright, citrusy note.
- Toss mini chocolate chips in the filling for a sweet surprise.
- Brush the pastry edges with cinnamon sugar before baking for extra flavor and crunch.
- Sprinkle chopped nuts like almonds or pecans on top after baking for a nice texture contrast.
Serving Suggestions
Cheese Danish pairs so nicely with your morning cup of coffee, a frothy cappuccino, or a soothing tea. For the kids, a cold glass of milk or chocolate milk is a winner every time. For brunch, serve alongside a fresh fruit salad or creamy yogurt to balance things out and create a spread everyone will love.
PrintA delicious and flaky Cheese Danish pastry made with puff pastry and a sweet cream cheese filling, perfect for breakfast or brunch.
- Prep Time: 15 minutes
- Cook Time: 13-17 minutes
- Total Time: 28-32 minutes
- Yield: 6 Cheese Danish pastries 1x
- Category: Breakfast Pastry
- Cuisine: American
Ingredients
- 1 sheet puff pastry, thawed
- 8 oz (225 g) cream cheese, softened
- 1/4 cup sugar
- 1 teaspoon vanilla extract
- 1 egg
- 1 tablespoon milk (for the egg wash)
- Optional: fruit preserves, powdered sugar glaze, fresh berries
Instructions
- Preheat oven to 200°C (400°F). Line a baking sheet with parchment paper.
- Roll out the puff pastry slightly on a clean surface. Cut into 6 equal squares.
- Carefully cut a smaller square inside each pastry square without cutting through, creating a groove to help the edges puff up.
- In a medium bowl, mix softened cream cheese, sugar, vanilla extract, and egg until smooth and creamy.
- Optionally, spoon a small amount of fruit jam into the center of each pastry square before adding cheese mixture.
- Spoon about 1-2 tablespoons of the cream cheese filling into the center of each pastry, staying within the inner groove to prevent overflow.
- Whisk egg with milk in a small bowl to make egg wash. Lightly brush the edges of each pastry square with egg wash for a golden finish.
- Bake for 13-17 minutes until pastry edges puff up and turn golden brown, and cheese filling is set and slightly risen.
- Remove from oven and let cool on a rack for 5-10 minutes to let filling settle.
- Optionally, drizzle with powdered sugar glaze and/or top with fresh berries before serving.
Notes
Do not overfill the pastries to avoid spilling during baking., Softened cream cheese ensures a smooth filling., Unbaked pastries freeze well; bake from frozen with slightly increased baking time., Add jam beneath cheese filling for extra flavor., Store leftovers in the fridge for up to 3 days., Reheat leftovers in a 350°F (175°C) oven for 5-7 minutes before serving., For variations, add lemon or orange zest, mini chocolate chips to the filling, cinnamon sugar on pastry edges before baking, or chopped nuts as topping.
Nutrition
- Serving Size: 1 pastry
- Calories: Approx. 250-300 calories per serving
- Fat: 18 g per serving
- Carbohydrates: 22 g per serving
- Protein: 6 g per serving
More in breakfast

Egg Muffins

Sausage Egg Casserole