Amazing 90-Minute french bread Secrets Revealed
Oh, that amazing sound! You know the one—the hollow thunk you hear when you gently tap the crust of a freshly baked loaf of bread? That’s the sweet sound of success right in your kitchen, my friends. This is exactly what you’ll get with this easy french bread recipe. Forget thinking that bread baking is only for pros!
Hi, I’m Lisa, and I’m here to tell you that this recipe reliably gives you bakery-quality bread without all the fuss. It’s quick, easy, and totally beginner-friendly. You’ll get that unforgettable crackly crust and a soft, fluffy inside all done in under two hours. I’ve baked this repeatedly just to make sure it works every single time—so you can skip the stress and dive right into deliciousness!
Create bakery-style French bread at home using this straightforward recipe. A crackling crust and delicate, fluffy crumb come together in under two hours—perfect for anyone just starting out.
- Author: Lisa
- Prep Time: 20 min
- Cook Time: 25 min
- Total Time: 1 hour 45 min
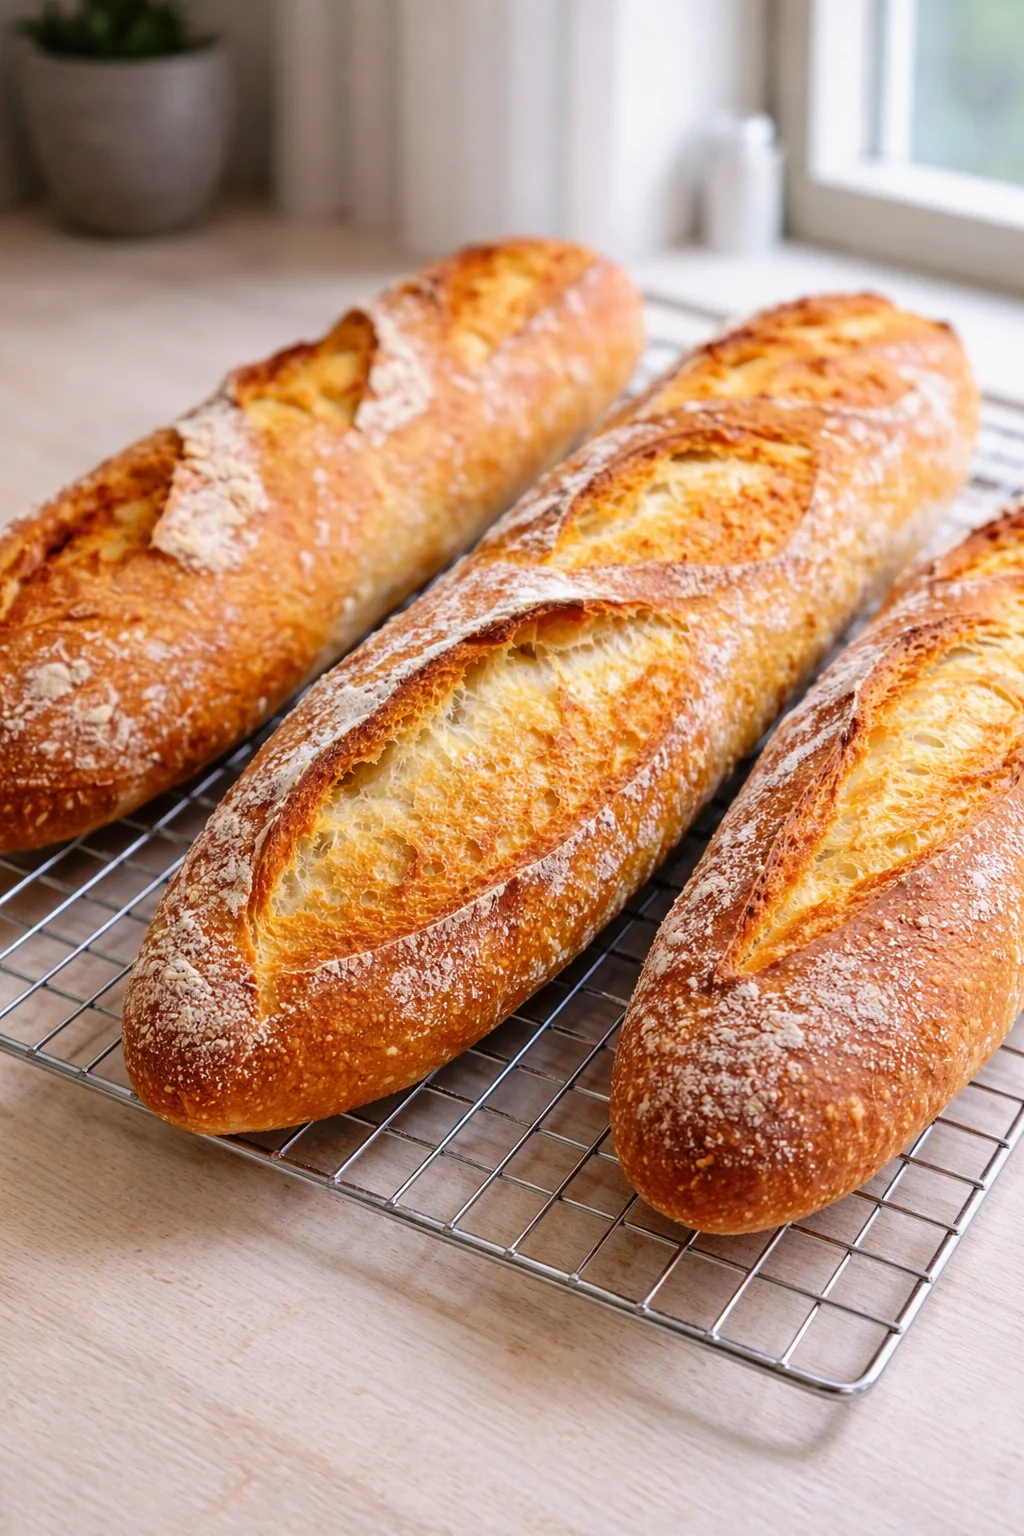
- Yield: 2 loaves
- Category: Bread
- Method: Baking
- Cuisine: French
- Diet: Vegetarian
Ingredients
- 1 1/2 cups warm water (105-115°F)
- 2 1/4 teaspoons active dry yeast
- 1 teaspoon granulated sugar
- 3 1/2 cups all-purpose flour, plus extra for dusting
- 1 1/2 teaspoons salt
- 1 tablespoon olive oil, plus more for greasing
Instructions
- In a large bowl, stir the sugar into the warm water until dissolved. Sprinkle the yeast on top and let it rest for 5 to 10 minutes until foamy and bubbly—that’s your yeast waking up.
- Add the flour, salt, and olive oil to the yeast mix. Use a wooden spoon or a stand mixer to combine until you get a rough, shaggy dough.
- Turn the dough out onto a floured surface and knead it for 5 to 7 minutes until it feels smooth and elastic. It should be a little tacky but not sticky—if it sticks to your fingers, add a dusting more flour.
- Grease a large bowl with olive oil, put your dough inside, and turn it around so it’s coated. Cover with plastic wrap or a clean towel, then let it rise in a warm place for about an hour until it doubles in size.
- After rising, gently punch down the dough. Cut it into two equal parts. Shape each portion into a long, narrow loaf, like a baguette but a bit thicker for easier handling.
- Place the loaves on a parchment-lined baking sheet, spacing them apart. Cover loosely and let them rest for another 20 minutes for a second rise.
- Preheat your oven to 425°F (220°C). While it heats, place a shallow pan on the bottom rack to hold water for steam.
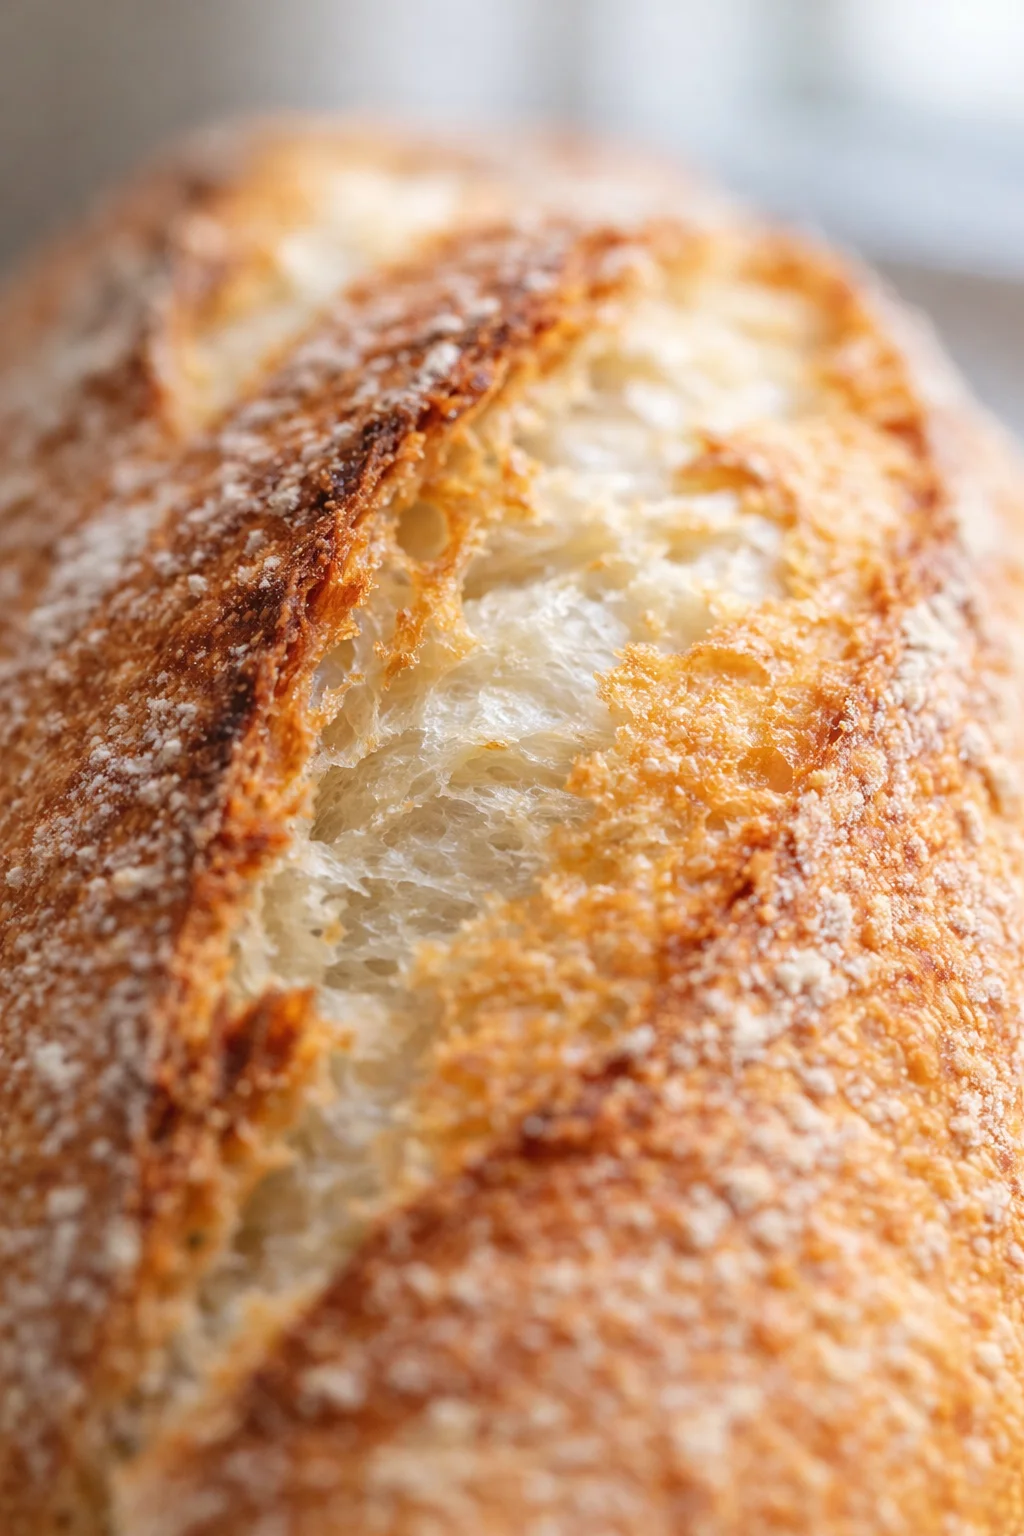
- Using a sharp knife or razor blade, make three diagonal slashes across the top of each loaf just before baking. This helps the bread expand correctly.
- Carefully pour 1 cup of hot water into the shallow pan on the bottom rack, then quickly slide in your baking sheet with the bread. Close the oven door fast to trap the steam.
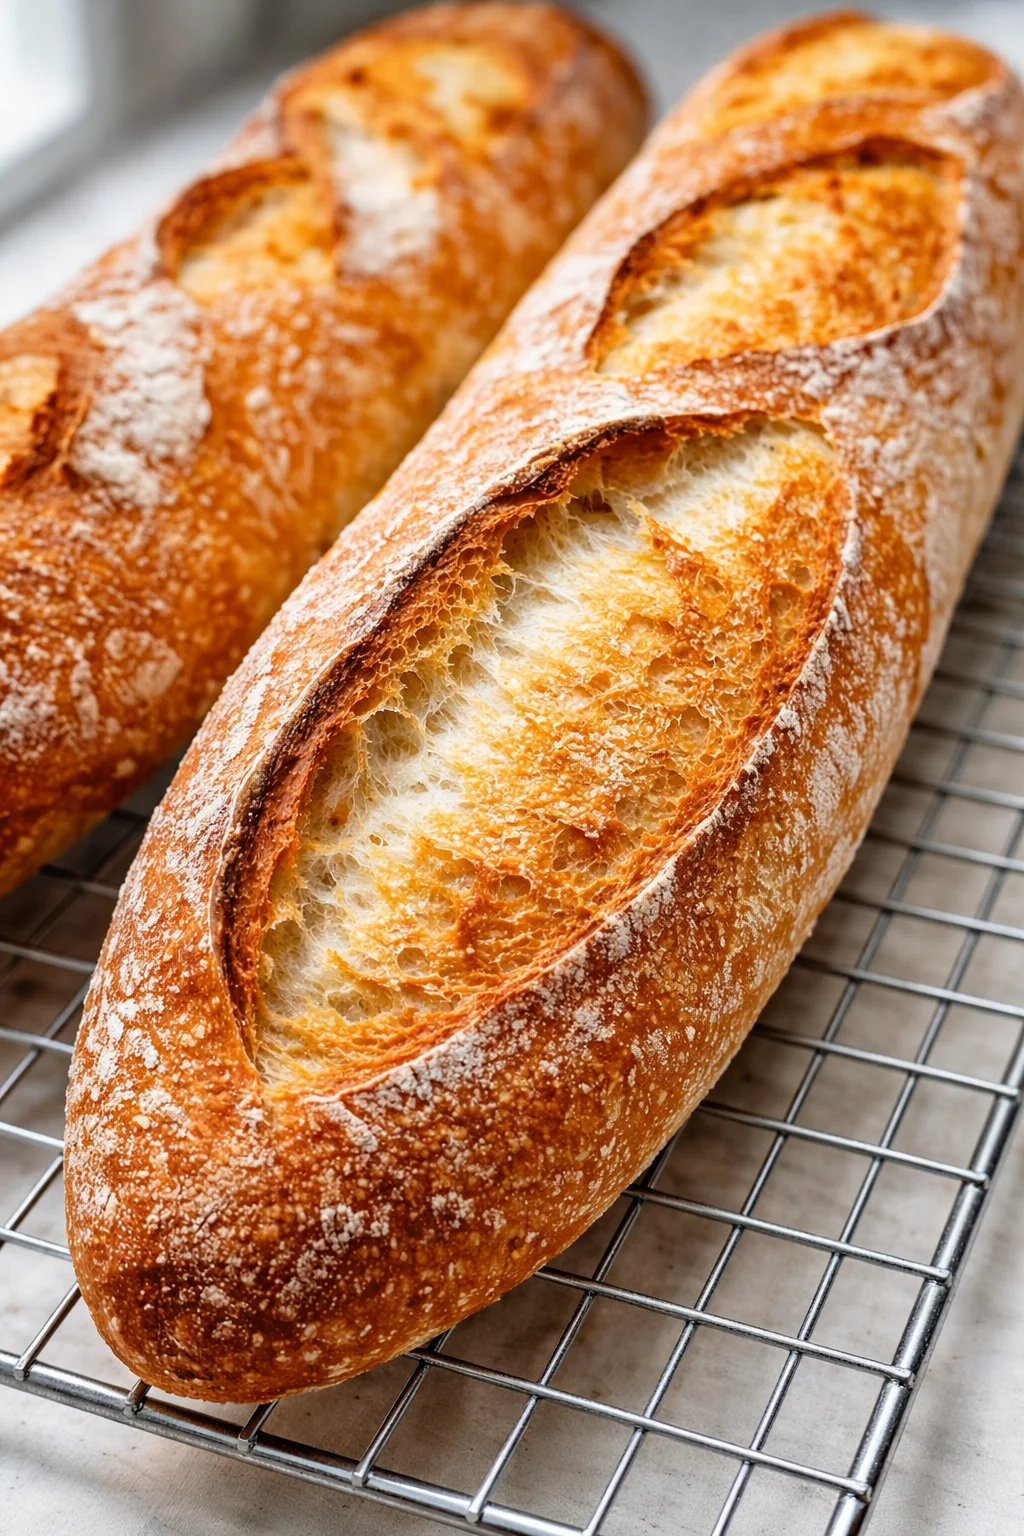
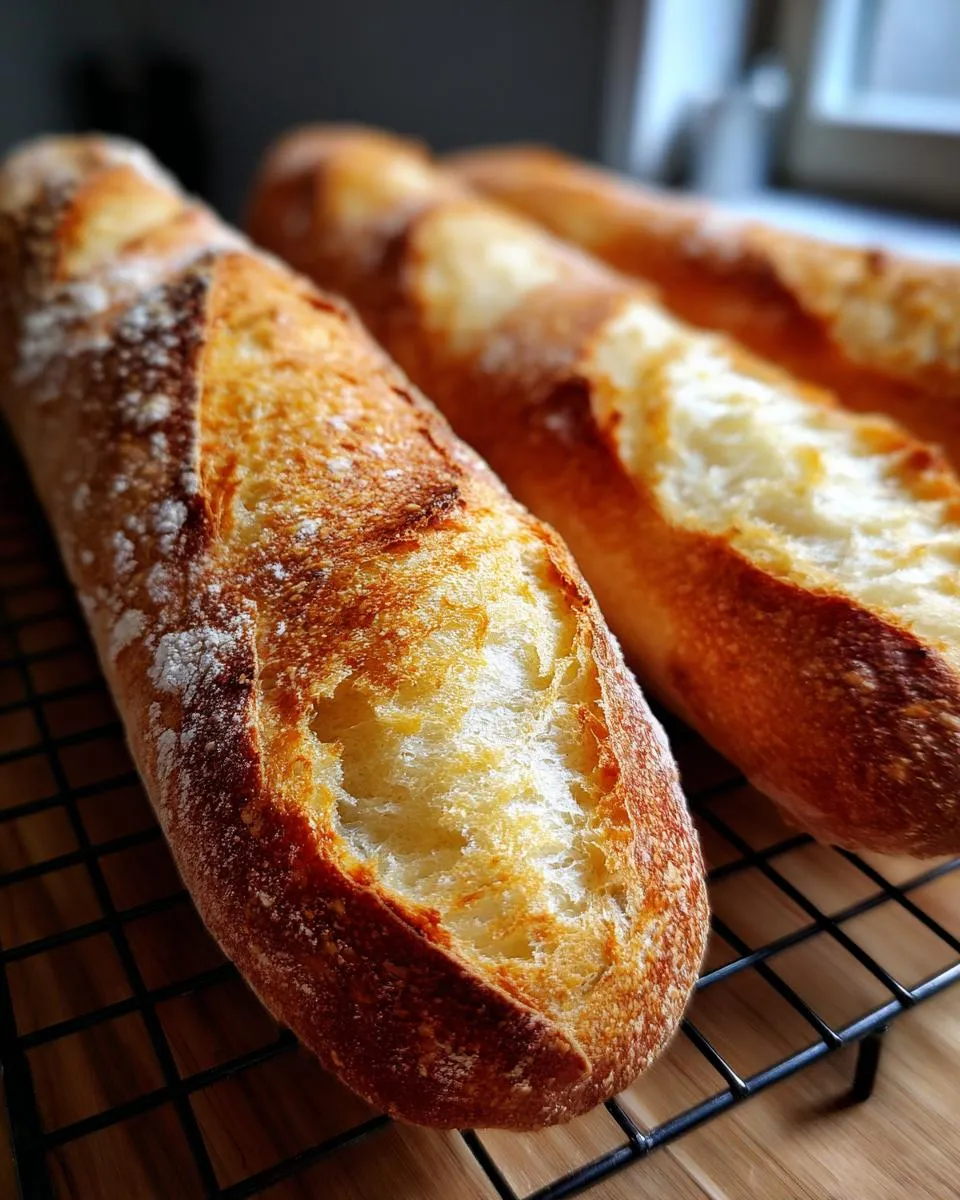
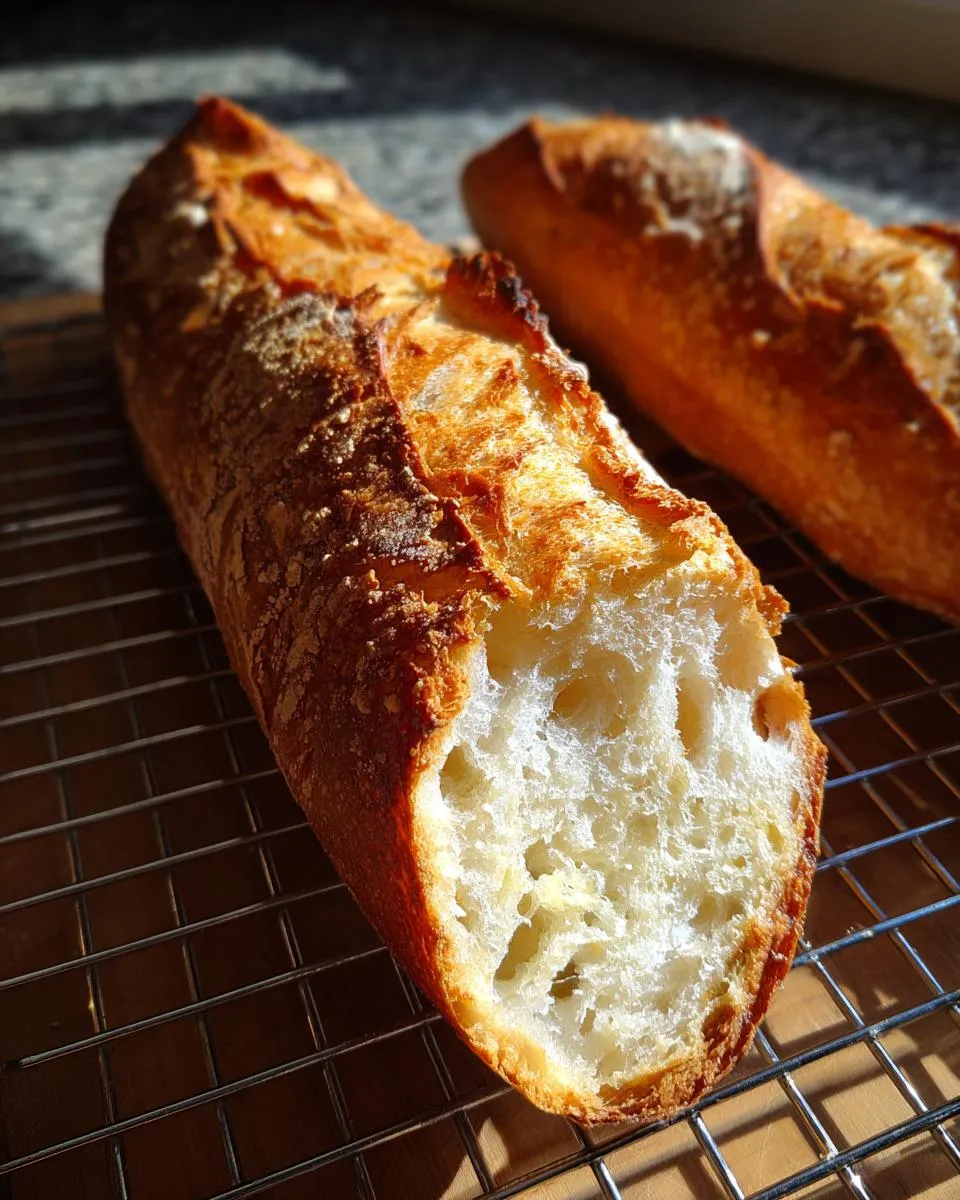
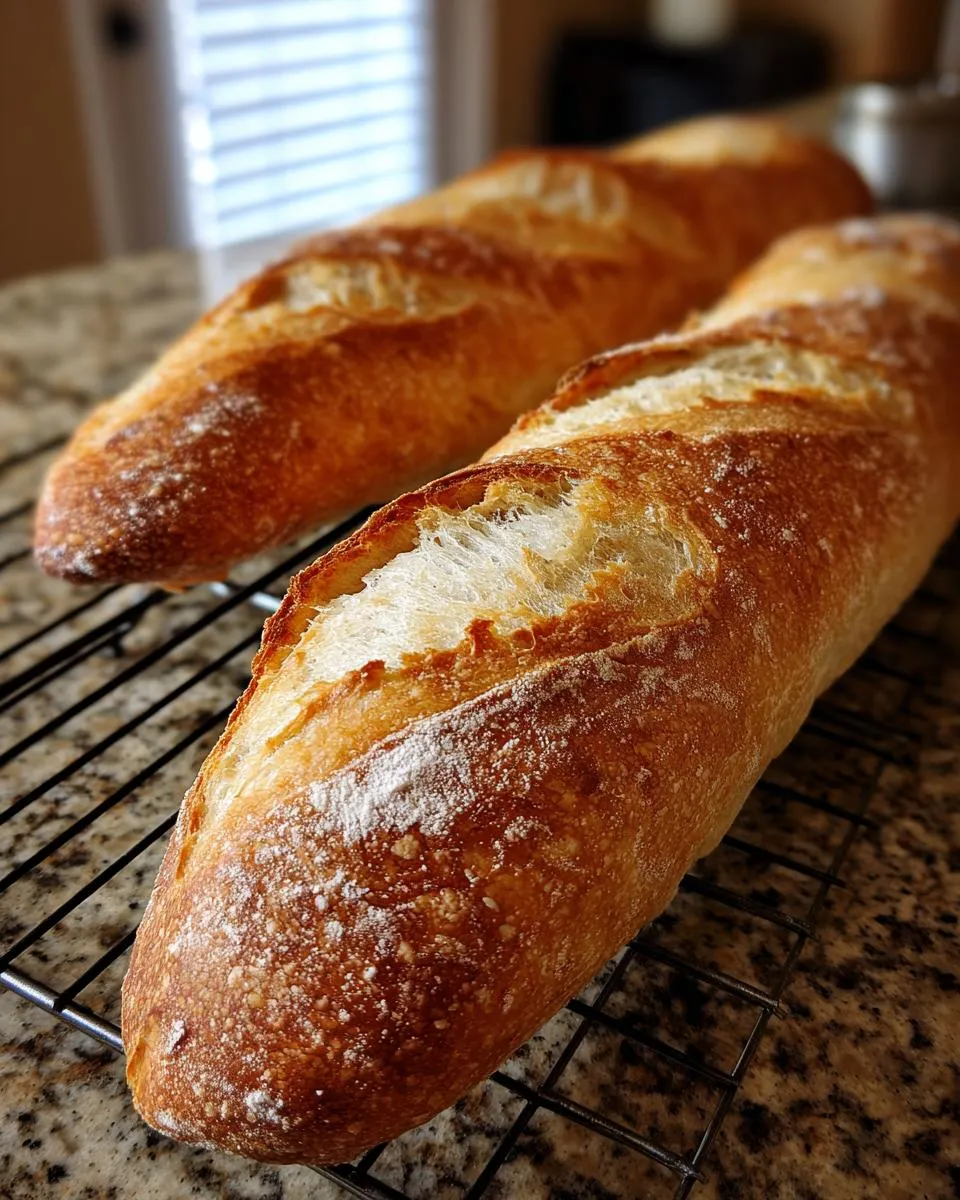
- Bake the bread for 20 to 25 minutes, rotating halfway through, until the crust is a rich golden brown and the loaf sounds hollow when you tap it.
- Remove the bread from the oven and let it cool completely on a wire rack before slicing. Get ready to enjoy your fresh, homemade French bread!
Notes
- Want an even crunchier crust? Spray your oven walls with water two or three times within the first 10 minutes of baking to keep the steam going strong.
- If you don’t have a stand mixer, hand kneading for 7 to 10 minutes will work just fine.
- This recipe makes two loaves, perfect for sandwiches or dipping into your favorite soup.
Nutrition
- Serving Size: 1/10 loaf
- Calories: 220
- Sugar: 1g
- Sodium: 300mg
- Fat: 1.5g
- Saturated Fat: 0.2g
- Unsaturated Fat: 1.3g
- Trans Fat: 0g
- Carbohydrates: 45g
- Fiber: 2g
- Protein: 7g
- Cholesterol: 0mg
Imagine tapping the warm crust of your homemade loaf and hearing that classic hollow thunk—that’s bakery-quality bread you made yourself, right in your kitchen. In this recipe, I’ll guide you step by step through the simplest, most reliable way to get a golden crackly crust with a soft, airy crumb in less than two hours.
We’ll begin by proofing the yeast to activate it, mix up an easy dough, knead just enough, let it rise once, shape two lovely long loaves, and use a quick steaming trick in a scorching hot oven to nail that perfect crust. I’ve tested this over and over so you can ditch the guesswork—no fancy starters or hard-to-find ingredients needed here.
- Timing: About 1 hour 45 minutes total from start to finish.
- Yield: Two bakery-style loaves, excellent for sandwiches or alongside a comforting bowl of soup.
- Skill level: Beginner-friendly with clear, straightforward steps.
- Result: A wonderful crisp crust paired with a tender, fluffy inside thanks to that high heat and steam trick.
Keep reading and I’ll share all the details and little tips that make your loaves look and taste like they came straight from your neighborhood bakery.
Why This Recipe Delivers
Maybe you’re thinking, “French bread? That sounds complicated and time-consuming.” Not in my kitchen! I designed this recipe because I wanted warm, crusty bread without spending all afternoon baking. It’s quick, friendly, and gets you perfect results every time.
- You’ll get that textbook crumb—ultra soft and fluffy inside that melts in your mouth with every slice.
- You’ll have two gorgeous loaves ready in under two hours. Talk about a 90 minute french bread win!
- It’s made with simple pantry staples, so you don’t need to hunt down anything fancy.
If you love fresh bread but hate the thought of waiting days or dealing with complicated starters, this recipe will become your go-to. Prefer a no-yeast, mix-and-bake loaf instead? Try our easy cheese bread. For serving, pair warm slices with homemade French onion dip for an effortless appetizer.
Bakery Style Bread Achieved Fast
Everyone wants that perfect shattering crust, right? It’s the hallmark of artisan bread, and here’s the best part: you don’t have to wait forever. The secret lies in baking at a high temperature with a quick burst of steam at the start. That little trick delivers a professional, crackly finish in just about 25 minutes of baking time—great for busy weeknights or any time you want fresh bread without the wait. For another fast, crusty loaf, try this 1-hour Italian bread.
Perfect for the Beginner Bread Making Enthusiast
Never handled yeast before? This is the place to start. I break down every step so you won’t be left guessing. No weird starters, no intimidating shaping techniques. This dough is forgiving, simple, and makes a perfect introduction to yeast breads. Trust me, with these measurements, you can’t mess it up! Once you’ve nailed this loaf, practice your new skills with soft Hot Cross Buns.
Ingredients and Equipment You’ll Need

- 1 1/2 cups warm water (105-115°F)
- 2 1/4 teaspoons active dry yeast
- 1 teaspoon granulated sugar
- 3 1/2 cups all-purpose flour, plus extra for dusting
- 1 1/2 teaspoons salt
- 1 tablespoon olive oil, plus extra for greasing
Mixing, Shaping, and Baking
- Stir sugar into 1 1/2 cups warm water (105–115°F) until dissolved, sprinkle 2 1/4 tsp active dry yeast on top and let rest 5–10 minutes until foamy.
- Add 3 1/2 cups all-purpose flour, 1 1/2 tsp salt, and 1 tbsp olive oil to the yeast mixture and mix until a rough, shaggy dough forms.
- Turn the dough onto a floured surface and knead 5–7 minutes until smooth, elastic, and slightly tacky, adding a dusting more flour if it sticks.
-
Grease a large bowl with olive oil, place the dough inside and turn to coat, cover with plastic wrap or a clean towel, and let rise in a warm place about 1 hour until doubled.

- Gently punch down the dough and divide it into two equal pieces.
- Shape each piece into a long, narrow loaf (slightly thicker than a baguette).
- Place the loaves on a parchment-lined baking sheet, spacing them apart, cover loosely and let rest 20 minutes for a second rise.
-
Preheat the oven to 425°F and place a shallow pan on the bottom rack to hold water for steam.
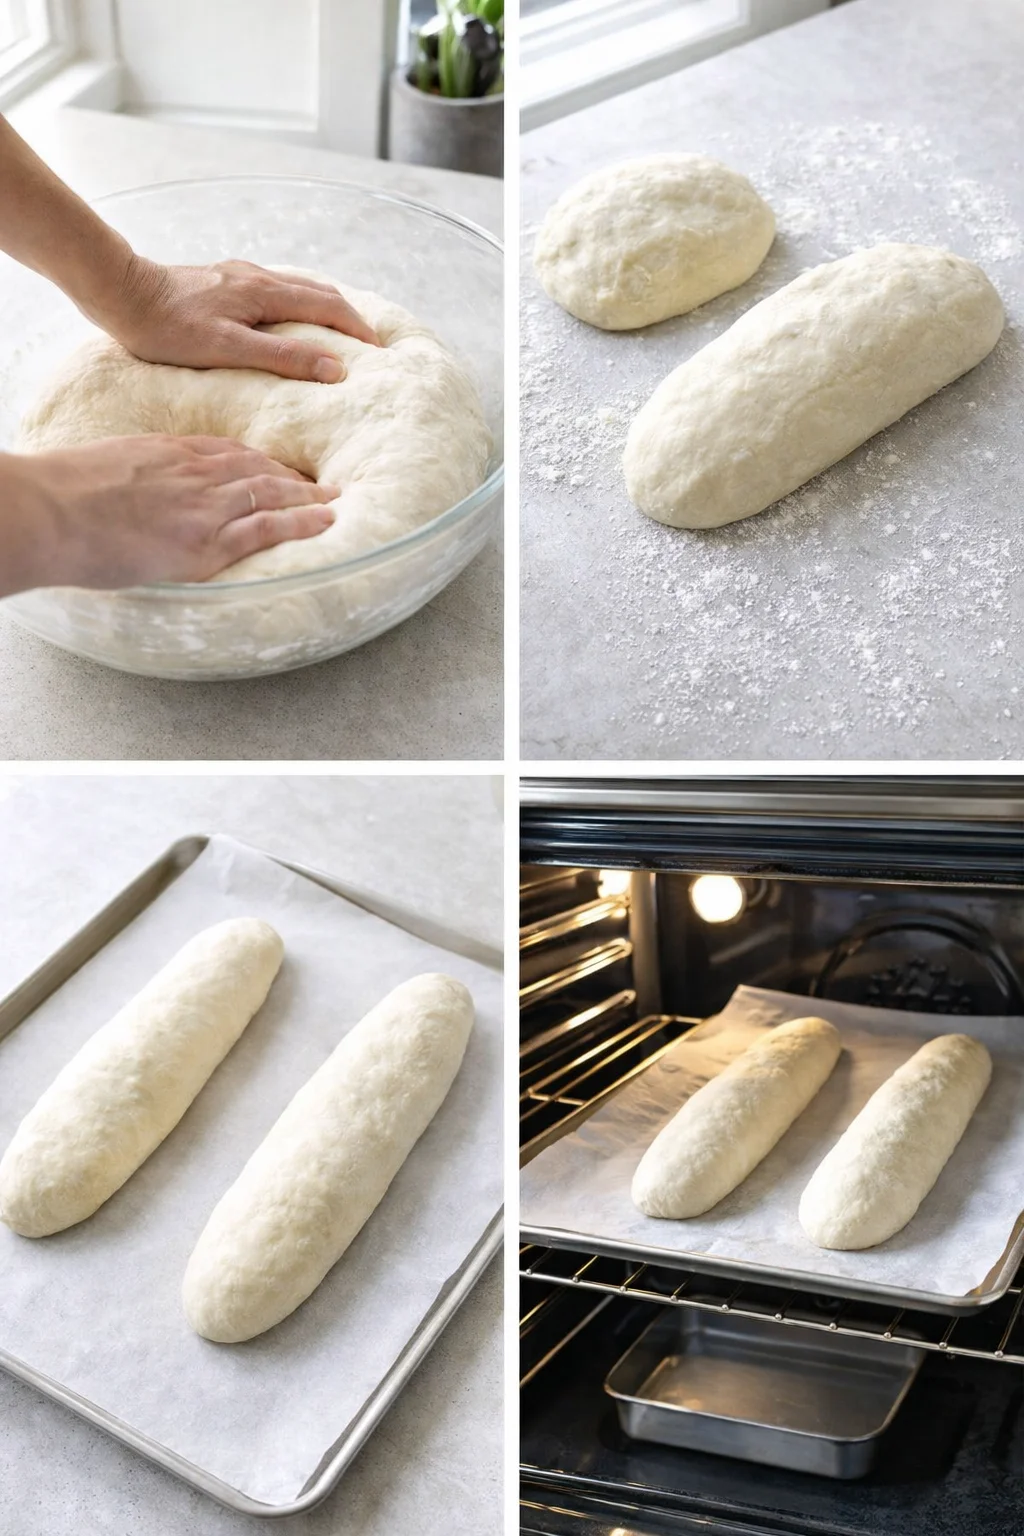
- Just before baking, make three diagonal slashes across the top of each loaf with a sharp knife or razor blade.
- Carefully pour 1 cup of hot water into the shallow pan on the bottom rack, quickly slide the baking sheet with the loaves into the oven, and close the door to trap the steam.
- About 5 minutes after baking begins, carefully open the oven and spray the oven walls with water using a clean spray bottle two or three times within the first 10 minutes to maintain steam.
-
Bake 20–25 minutes, rotating the baking sheet halfway through, until the crust is deep golden brown and the loaf sounds hollow when tapped.

-
Remove the loaves from the oven and cool completely on a wire rack before slicing.
Baking Tips for Crust and Crumb
Making bread that looks and tastes professional doesn’t mean you need fancy equipment or a bakery oven. It just means paying close attention to a few key details during baking. Over the years, I’ve gathered some handy tricks that take a good loaf to great, and I’m sharing them with you here.
First off, heat and humidity are your best friends. Don’t rush preheating your oven—it needs to be fully up to 425°F to get that crust started. When you pop the bread in and add hot water to the steam pan, keep that steam going strong for the first part of baking.
About five minutes after baking starts, carefully open the oven door and spray the oven walls with water using a clean spray bottle. Repeat two or three times during the first 10 minutes. This locks moisture in the oven creating that fantastic crunchy crust.
Now, scoring—the slashes you make on the top—are super important. If your blade isn’t razor-sharp or if you don’t cut deep enough, the bread will burst open in odd spots, usually near the bottom, which isn’t pretty. So be bold with your cuts! Deep, confident slashes direct the bread to expand perfectly. It’s a simple step that makes a big difference in your loaf’s look and texture.
This bread is a shining star beside nearly any meal—try it alongside a bowl of Broccoli Chickpea Pasta with Garlic Olive Oil. Have you ever tried using fresh crusty simple yeast bread to soak up every little drop of gravy or stew? It turns even a quick weeknight supper into something cozy and special without extra effort.
And sandwiches! Forget the sad, squishy store-bought stuff—slice this loaf horizontally and you’ve got a sturdy, tasty base for anything from classic deli meats to juicy garden tomatoes. A quick BLT on a loaf like this will blow your mind—the crust definitely steps up the sandwich game.
Flavor and Flour Swaps

If you want to shake things up, here are some easy swaps and additions you can try for different flavors or textures, no complicated rewrites needed. Just watch the dough’s feel and rise times when you make changes.
- Bread flour: Swap bread flour 1:1 for all-purpose if you want a chewier, more artisan-style crumb. Bread flour absorbs more water, so add 1–2 tablespoons extra water if the dough feels stiff.
- Whole wheat or part-whole wheat: Substitute up to half the all-purpose flour with whole wheat for a nuttier flavor. Since whole wheat soaks up more liquid, add 2–4 tablespoons extra water and knead a bit longer; the rise may take slightly more time.
- Instant (rapid-rise) yeast: Use the same amount (2 1/4 tsp). You can mix it straight into dry ingredients and skip the proofing step, but letting it rise until doubled still helps flavor. It’ll rise a bit faster.
- Honey or maple syrup for sugar: Substitute for the granulated sugar in roughly equal amounts. Because these are liquids, reduce water by 1–2 tablespoons to keep dough right.
- Butter or neutral oil instead of olive oil: Use melted butter for a richer, softer crumb, or neutral oils like canola or vegetable oil if you like.
- Milk or milk/water mix: Replace some or all water with warm milk for a softer, more tender crumb and deeper golden crust. For a fully enriched, swirled-loaf example, see Apricot Cream Cheese Babka.
- Seeds and toppings: Brush loaves with water or egg wash and sprinkle sesame seeds, poppy seeds, or kosher salt for extra flair and texture.
- Cheesy or herbed loaves: Fold in 3/4–1 cup shredded cheese (Parmesan or cheddar) while shaping or brush loaves with garlic-herb butter after baking for a savory twist. If you’re craving a French, cheese-forward bake, try classic Gougères for airy, bite-size puffs.
- Use a Dutch oven for steam: Preheat a Dutch oven at 425°F, bake the shaped loaf inside covered for 12–15 minutes, then uncover and finish baking. This traps steam perfectly for a great crust.
- Different shapes: Shape into rolls, a sandwich loaf (bake in greased loaf pan), or shorter baguettes. Adjust baking times accordingly (rolls about 15–18 minutes; loaf pan might need a little longer). Look for golden crust and hollow sound when tapped. For cozy pairings, rolls are perfect for dunking—see our best soup recipes.
Whenever you change flours or add dense things like seeds or cheese, keep an eye on dough feel and rise times. You might need to add a little extra water or rise a bit longer. Otherwise, keep oven temps and steam the same for reliable crust every time.
How to Store and Refresh
Once your loaves have cooled completely—and yes, I know waiting is the hardest part!—it’s time to store them so that amazing crust stays crisp. Never refrigerate fresh bread, as it dries out quickly and becomes stale. Instead, keep it at room temperature, loosely wrapped in a paper bag or clean cotton kitchen towel, for up to two days. This keeps the inside soft without making the crust soggy.
Want to get that fresh-baked smell and crust back? Pop the loaf into a 350°F oven for about five minutes—this quick heat refreshes the crust and warms the crumb. For a cozy appetizer, pair warm slices with Baked Brie with Cranberry Sauce. Or, for a fun twist with a day-old loaf, crosshatch it and turn it into cheesy garlic pull-apart bread.
Troubleshooting and FAQs
I get a bunch of questions about this recipe, which just shows how many people are excited to bake their own bread! Don’t worry if you have questions—it means you’re on your way to baking confidence. Nail these small details and you’ll be amazed at your results.
Can I use Bread Flour instead of All-Purpose Flour in this french bread recipe?
Absolutely! Bread flour has a higher protein level, which helps develop more gluten for a chewier texture. If you swap in bread flour, you’ll get a slightly heartier, more artisan-style crumb. But this recipe was designed with all-purpose flour to give that soft, fluffy bread result. So, if you want the exact texture here, stick with all-purpose.
What is the best way to get that authentic crackly crust on my homemade french bread?
It’s all about balancing heat and humidity! The key trick is the steam you create by pouring hot water into the pan on the oven’s bottom rack as you start baking. Plus, make sure you preheat your oven thoroughly to 425°F—don’t skip this step! The optional spraying of oven walls during the first few minutes locks in moisture and helps the crust get that irresistible crunchy finish. That’s your ticket to classic crusty French bread crust every time.

A quick and easy French bread recipe that yields two bakery-style loaves with a crackly crust and soft, fluffy crumb in under two hours. Beginner-friendly and made with simple pantry staples.
- Prep Time: 20 minutes
- Cook Time: 25 minutes
- Total Time: 1 hour 45 minutes
- Yield: 2 loaves 1x
- Category: Bread
- Cuisine: French
Ingredients
- 1 1/2 cups warm water (105-115°F)
- 2 1/4 teaspoons active dry yeast
- 1 teaspoon granulated sugar
- 3 1/2 cups all-purpose flour, plus extra for dusting
- 1 1/2 teaspoons salt
- 1 tablespoon olive oil, plus extra for greasing
Instructions
- In a large bowl, stir the sugar into the warm water until dissolved. Sprinkle the yeast on top and let rest for 5 to 10 minutes until foamy and bubbly, indicating the yeast is activated.
- Add the flour, salt, and olive oil to the yeast mixture. Mix with a wooden spoon or stand mixer until a rough, shaggy dough forms.
- Turn the dough onto a floured surface and knead for 5 to 7 minutes until smooth, elastic, and slightly tacky. Add more flour if it sticks to your fingers.
- Grease a large bowl with olive oil, place the dough inside, turning to coat it. Cover with plastic wrap or a towel and let rise in a warm place until doubled in size, about 1 hour.
- Punch down the risen dough and divide into two equal portions.
- Shape each portion into a long, narrow loaf, slightly thicker than a baguette.
- Place the loaves on a parchment-lined baking sheet spaced apart. Cover loosely and let rest for 20 minutes for a second rise.
- Preheat oven to 425°F (220°C) and place a shallow pan on the bottom rack to hold water for steam.
- Make three diagonal slashes across the top of each loaf using a sharp knife or razor blade just before baking.
- Carefully pour 1 cup of hot water into the shallow pan on the bottom rack, quickly slide the baking sheet with the loaves into the oven, and close the door to trap steam.
- About 5 minutes after baking begins, carefully open the oven and spray the oven walls with water two or three times within the first 10 minutes to maintain steam.
- Bake 20 to 25 minutes, rotating halfway through, until the crust is golden brown and the loaf sounds hollow when tapped.
- Remove bread from oven and cool completely on a wire rack before slicing and serving.
Notes
For an even crunchier crust, spray the oven walls with water multiple times during the first 10 minutes of baking to maintain steam., If you don’t have a stand mixer, hand kneading for 7 to 10 minutes works fine., This recipe yields two loaves perfect for sandwiches or dipping into soup.
Nutrition
- Serving Size: 1/10 loaf
- Calories: 220
- Fat: 1.5g
- Carbohydrates: 45g
- Protein: 7g