Pickled Garlic Recipe

Picture this: a simple bunch of garlic cloves transformed into a lively, tangy pickle that brightens up your dishes. This recipe guides you step-by-step through crafting spicy, flavorful pickled garlic using pantry staples like vinegar, a little sugar, salt, and warming spices, resulting in a fragrant jar you’ll want to keep handy.
Here’s what you’re in for: about 20 minutes of active work peeling and putting ingredients together, a quick simmer to let all the flavors marry, then some time to cool down before your garlic takes its chill in the fridge. After about 24 hours in the fridge, the garlic’s ready, with flavors growing richer the longer it rests. This recipe yields one jar full of perfectly balanced pickled garlic with just the right combo of tang, sweetness, and spice.
Stick around for easy-to-follow instructions, tips for getting unbeatable flavor and texture, ideas to mix things up by swapping ingredients or dialing heat up or down, storage hacks, and answers to all your burning questions about pickling.
Keep garlic cloves in a spicy, tangy pickling mix to add bold flavor to your meals.
Why You’ll Reach for This
Pickled garlic is one of those simple kitchen wonders that can really bring your cooking to life with hardly any hassle. It’s quick, it keeps well, and its vibrant flavor only gets better over time.
- Fast and fuss-free: Uses ingredients you probably already have, with just 20 minutes of hands-on time before the fridge does its magic.
- Super versatile: A zesty, lightly sweet and spicy punch for sandwiches, salads, grilled dishes, Antipasto Skewers, or just for snacking straight from the jar.
- Totally customizable: Feel free to swap vinegars like apple cider for a fruity twist, replace sugar with honey, or amp the heat with more dried chilies and pepper flakes to suit your taste buds—see this easy refrigerator pickled vegetables recipe for more quick-pickle variation ideas.
- Lasts a while: Stored properly in the fridge, it stays tasty for weeks. Perfect for prepping ahead and always having something special on hand.
- Good for you: Garlic is packed with healthful compounds like allicin, all while being low in calories—so you can enjoy bold flavor without worries.
Ingredients and Measurements
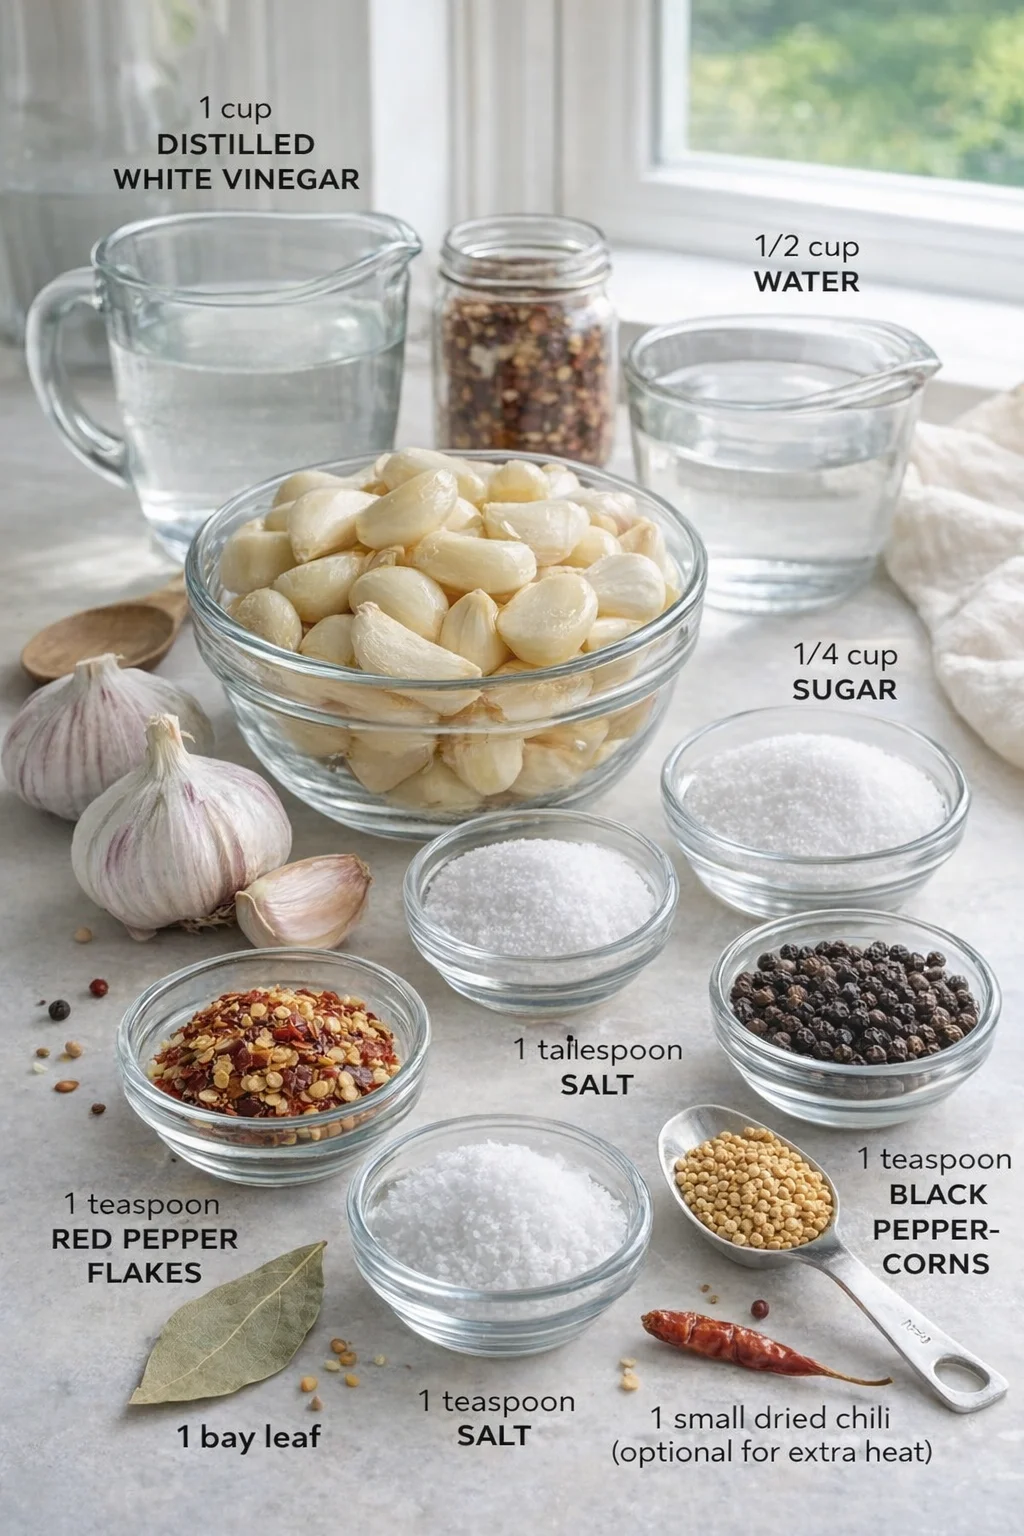
- 2 cups garlic cloves, peeled
- 1 cup distilled white vinegar
- 1/2 cup water
- 1/4 cup sugar
- 1 tablespoon salt
- 1 teaspoon red pepper flakes
- 1 teaspoon black peppercorns
- 1 bay leaf
- 1 tablespoon mustard seeds
- 1 small dried chili (optional for extra heat)
How to Make It
- Select fresh, firm garlic cloves.
- Peel the garlic cloves.
- Place peeled cloves into a clean jar or glass container.
-
Combine distilled white vinegar, water, sugar, and salt in a small saucepan.

- Warm over medium heat and bring the mixture to a boil, stirring until sugar and salt dissolve.
- Add red pepper flakes, black peppercorns, mustard seeds, bay leaf, and optional dried chili to the boiling liquid.
- Simmer the spiced pickling liquid gently for 5 minutes.
-
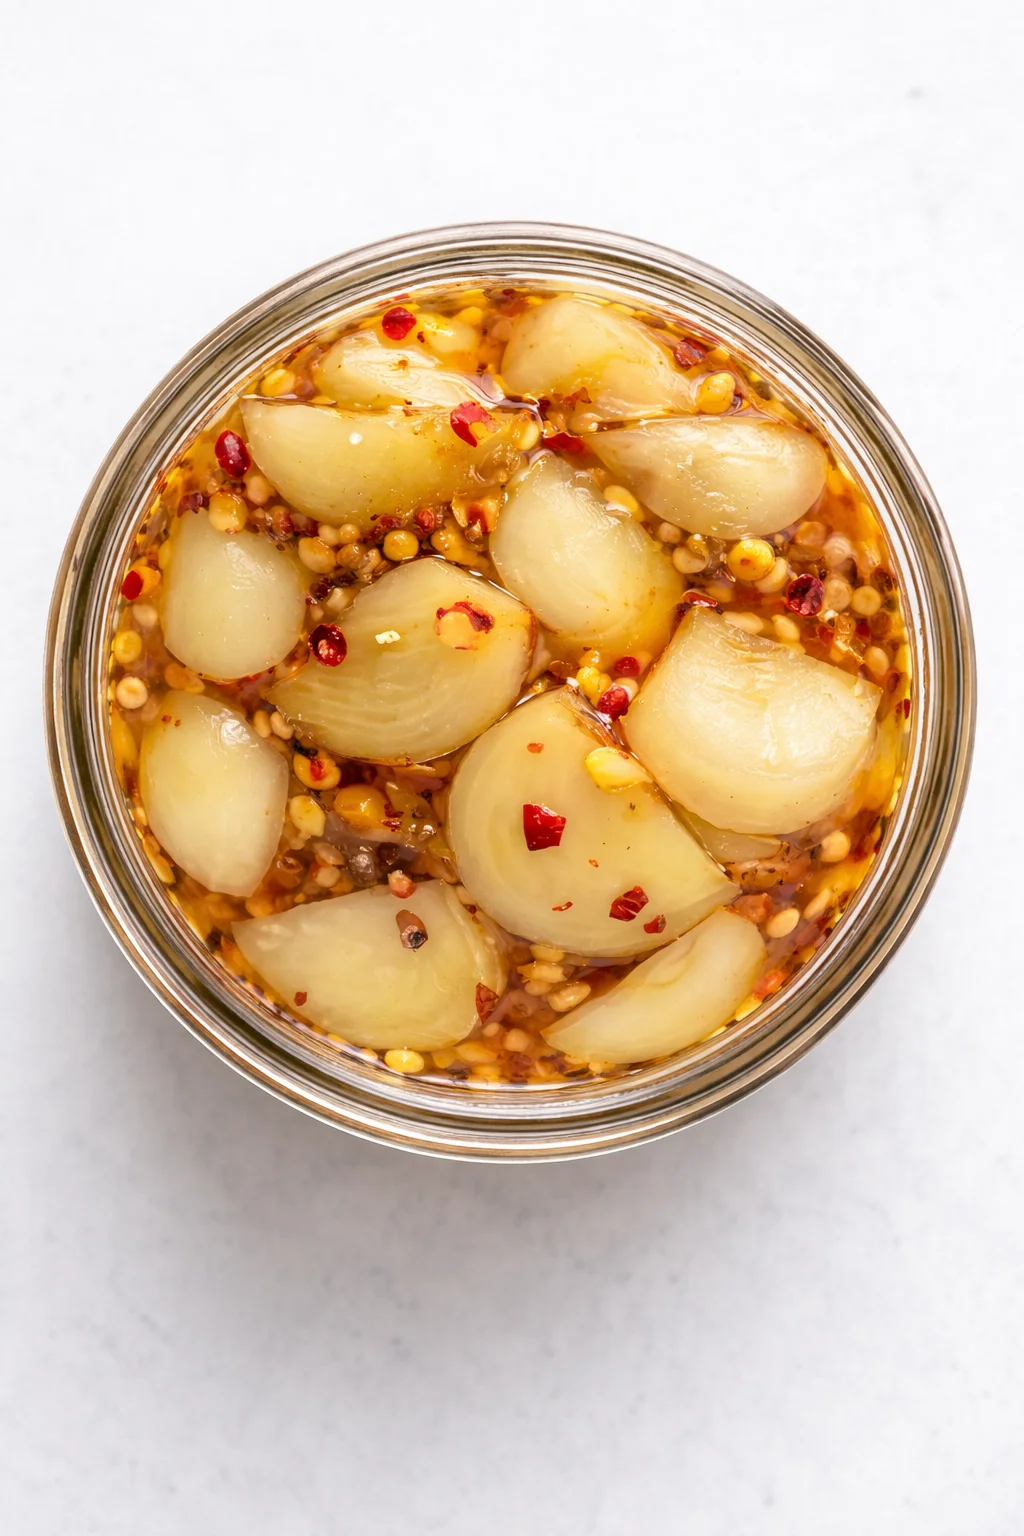
Carefully pour the hot spiced vinegar mixture over the garlic, making sure cloves are fully submerged.
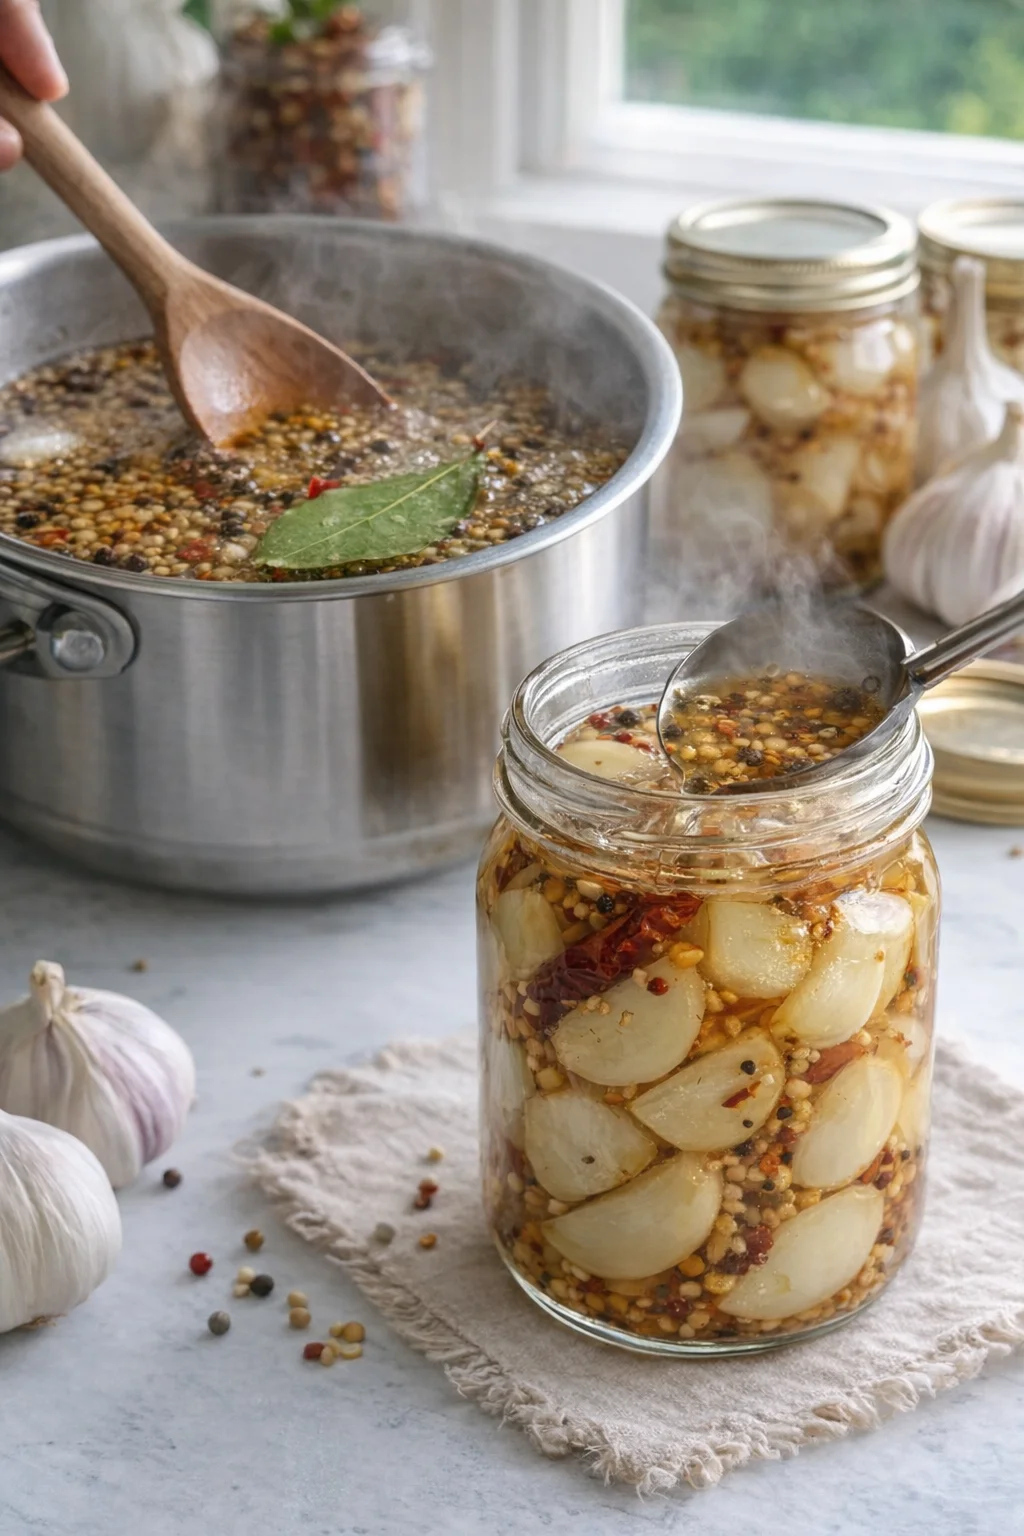
- Use a clean weight or spoon to press down any floating cloves.
- Tighten the jar lid and let the jar cool on the counter for 1–2 hours.
- Refrigerate the sealed jar.
-
Allow the garlic to marinate in the refrigerator at least 24 hours before eating, longer for deeper flavor.

Pro Tips for Best Results
Pickled garlic is one of those multi-tasking kitchen gems. Here are some favorite ways I use mine:
- Add to grilled meats: Sprinkle on steaks or chicken for extra tang and spice.
- Make sandwiches pop: Give your subs and wraps a zesty garlic twist.
- Boost your salads: Toss a few cloves into greens or grain bowls like this One-Pan Roasted Carrot and Chickpea Bowl for depth and heat.
- Snack right out of the jar: Garlic lovers will adore this bold, tasty bite—or add a small bowl to your next charcuterie board.
To get the best results, avoid these common mistakes:
- Don’t skimp on peeling: Unpeeled cloves can taste bitter and uneven.
- Make sure garlic is fully submerged: Air exposure can cause spoilage or uneven flavoring.
- Give enough time to marinate: 24 hours minimum, but longer means more mellow, deeper flavor.
Flavor Variations and Swaps

Want to tweak this pickled garlic to better fit your needs? Here are some easy swaps and changes. If you love a little heat, borrow the chili-and-vinegar balance from these spicy pickled carrots to make a hot version.
- Cut down sugar: Substitute with stevia or another sugar alternative for fewer calories.
- Lower the salt: Use a salt substitute or halve the amount if you’re watching sodium.
- Try different vinegars: Apple cider vinegar brings a fruity vibe and some digestion-friendly benefits; for a lighter, crisp brine, see how it’s used in pickled celery.
How to Store and Keep Fresh
Keep your pickled garlic fresh and flavorful with these storage tips—and if you’re pickling other veggies, our Spicy Pickled Asparagus recipe covers similar storage pointers:
- Always refrigerate to slow down bacteria and keep it tasty.
- Use airtight jars or containers to avoid odors mixing and keep garlic crisp.
- Enjoy within 3 months for the best flavor and texture.
Answers to Common Questions
Q: Can I use pre-peeled garlic?
A: Absolutely! Pre-peeled garlic can save you time, just make sure it’s fresh for the best results.
Q: How long does pickled garlic last in the fridge?
A: Stored in a sealed container, it stays good for up to 3 months.
Q: Is pickled garlic healthy to eat?
A: Yes, it’s low in calories and packed with allicin, which has antimicrobial and antioxidant benefits to support your health. For a balanced way to enjoy it, try adding a few cloves to Broccoli Chickpea Pasta with Garlic Olive Oil.

A lively, tangy pickled garlic recipe using vinegar, sugar, salt, and warming spices. Quick to prepare and perfect for adding bold flavor to various dishes.
- Prep Time: 20 minutes
- Cook Time: 10 minutes
- Total Time: 1 day 30 minutes (including marinating time)
- Yield: 1 jar 1x
- Category: Condiment
Ingredients
- 2 cups garlic cloves, peeled
- 1 cup distilled white vinegar
- 1/2 cup water
- 1/4 cup sugar
- 1 tablespoon salt
- 1 teaspoon red pepper flakes
- 1 teaspoon black peppercorns
- 1 bay leaf
- 1 tablespoon mustard seeds
- 1 small dried chili (optional for extra heat)
Instructions
- Select fresh, firm garlic cloves.
- Peel the garlic cloves.
- Place peeled cloves into a clean jar or glass container.
- Combine distilled white vinegar, water, sugar, and salt in a small saucepan.
- Warm over medium heat and bring the mixture to a boil, stirring until sugar and salt dissolve.
- Add red pepper flakes, black peppercorns, mustard seeds, bay leaf, and optional dried chili to the boiling liquid.
- Simmer the spiced pickling liquid gently for 5 minutes.
- Carefully pour the hot spiced vinegar mixture over the garlic, making sure cloves are fully submerged.
- Use a clean weight or spoon to press down any floating cloves.
- Tighten the jar lid and let the jar cool on the counter for 1–2 hours.
- Refrigerate the sealed jar.
- Allow the garlic to marinate in the refrigerator at least 24 hours before eating, longer for deeper flavor.
Notes
To achieve the best flavor, ensure garlic cloves are fully peeled and completely submerged in the pickling liquid., Flavor develops over time; best after at least 24 hours, improves with longer marinating., Customize heat level by adjusting the amount of red pepper flakes and dried chili., Try swapping distilled white vinegar with apple cider vinegar for a fruity twist., Sugar can be replaced with honey or a sugar alternative for fewer calories., Salt amount can be adjusted to taste or replaced with a salt substitute., Always refrigerate and use airtight containers to keep garlic fresh up to 3 months.
Nutrition
- Serving Size: 1 clove
- Calories: Approximately 10 calories per garlic clove
- Fat: Negligible
- Carbohydrates: Approx 2g per serving
- Protein: Less than 1g per serving